6 Making a Bioconductor package
This chapter demonstrates how to make a Bioconductor package using a workflow that utilises the following R packages:
- rworkflows (CRAN)
- usethis (CRAN)
- biocthis (Bioconductor)
This is just one example of an opinionated workflow for making a Bioconductor-friendly package, highlighting accessory packages with the goal of helping automate the process of creating R packages for Bioconductor or making them Bioconductor-friendly.
It is not a requirement to follow this workflow when preparing a package for submission to the Bioconductor repository. Many package developers learn from the experience of developing their first packages and develop their own personal preferences and templates, when working on their subsequent packages.
Throughout this chapter, this example is used to illustrate essential and recommended components for Bioconductor packages, to give readers knowledge and information allowing them to develop Bioconductor packages independently of this workflow, if they so wish.
6.1 Environment
This workflow was written on the operating system macOS Big Sur. Other operating systems may require some adjustments.
This workflow uses RStudio Desktop.
This workflow was written using R version 4.1.2 (2021-11-01) – “Bird Hippie”.
This workflow starts in the RStudio application, outside of any RStudio project.
6.2 Install accessory packages
First, we install the CRAN package remotes, if it is not installed yet.
if (!requireNamespace("remotes", quietly = TRUE)) {
    install.packages("remotes")
}
6.2.1 CRAN packages
Next, we immediately used the newly installed package to install a number of CRAN packages that will be used to develop the new Bioconductor package.
remotes::install_cran(
    c(
        "available",
        "devtools",
        "knitr",
        "pkgdown",
        "RefManageR",
        "rmarkdown",
        "rstudioapi",
        "sessioninfo",
        "styler",
        "usethis",
        "rworkflows"
    )
)
6.2.2 Bioconductor packages
Next, we install the Bioconductor packages if they are not yet installed.
BiocStyle will be used for styling the vignettes of the new Bioconductor package and linking to other packages.
remotes::install_bioc(c("biocthis","BiocStyle")) 6.3 Check if the package name is available on CRAN and Bioconductor
Packages submitted to the Bioconductor repository must have a name that is not currently used on neither CRAN nor Bioconductor. Furthermore, it is a good idea to check whether the package name exists as a GitHub repository, in case another package with that name is being developed and/or submitted.
We use the newly installed CRAN package available to check whether the name that we want to give to the new package is already in use in either Bioconductor or CRAN, or has a meaning that we might not be aware of.
available::available("MyBioconductorPackage")If prompted whether to report potentially offensive results in the
Urban Dictionary, type Y or N depending on your preference, and press the
Return key.
Note that the function available::available() displays some information in
the R console of the RStudio application, while simultaneously opening a number
of tabs in our default web browser.
The information in the R console indicates whether the package name is syntactically valid and not in use yet on CRAN, Bioconductor, or GitHub. If you opted for the Urban Dictionary, the console also reports the meaning and sentiment analysis for words and acronym that the name of the package, as well as sub-strings and acronym that the name of the package contains
Each tab in your default web browser reports the result of a search on Wikipedia, Wiktionary, and other websites, for the name of the package, sub-strings, and acronyms. It is up to you to check the contents of those pages and decide whether you wish to continue the process with that package name.
6.4 Create a package template
Once we are satisfied with the name of your package, we can begin creating the package using a template. Here, we provide two alternative workflows for creating an R package template:
-
Using
rworkflows: Quick and easy with dynamic autofilling of redundant information. -
Using
usethis+biocthis: Requires more manual steps, but enables more extensive cutomisability.
6.4.1 Using rworkflows
templateR is an R package template distributed via GitHub and is part of the rworkflows suite.
It aims to automate R package creation as much as possible by filling out the template for you with using information extracted from the DESCRIPTION file. This minimises the amount of time you have to spend entering the same information in manually for each file (e.g. package name/description, documentation site, vignette links). Importantly, it does this dynamically such that if you ever decide to change any of these fields, the updated information will be automatically propagated to all relevant files in your package.
To create your template, simply navigate to the templateR GitHub repository and click the Use this template button in the upper right, and follow the steps to create a new Github repository:
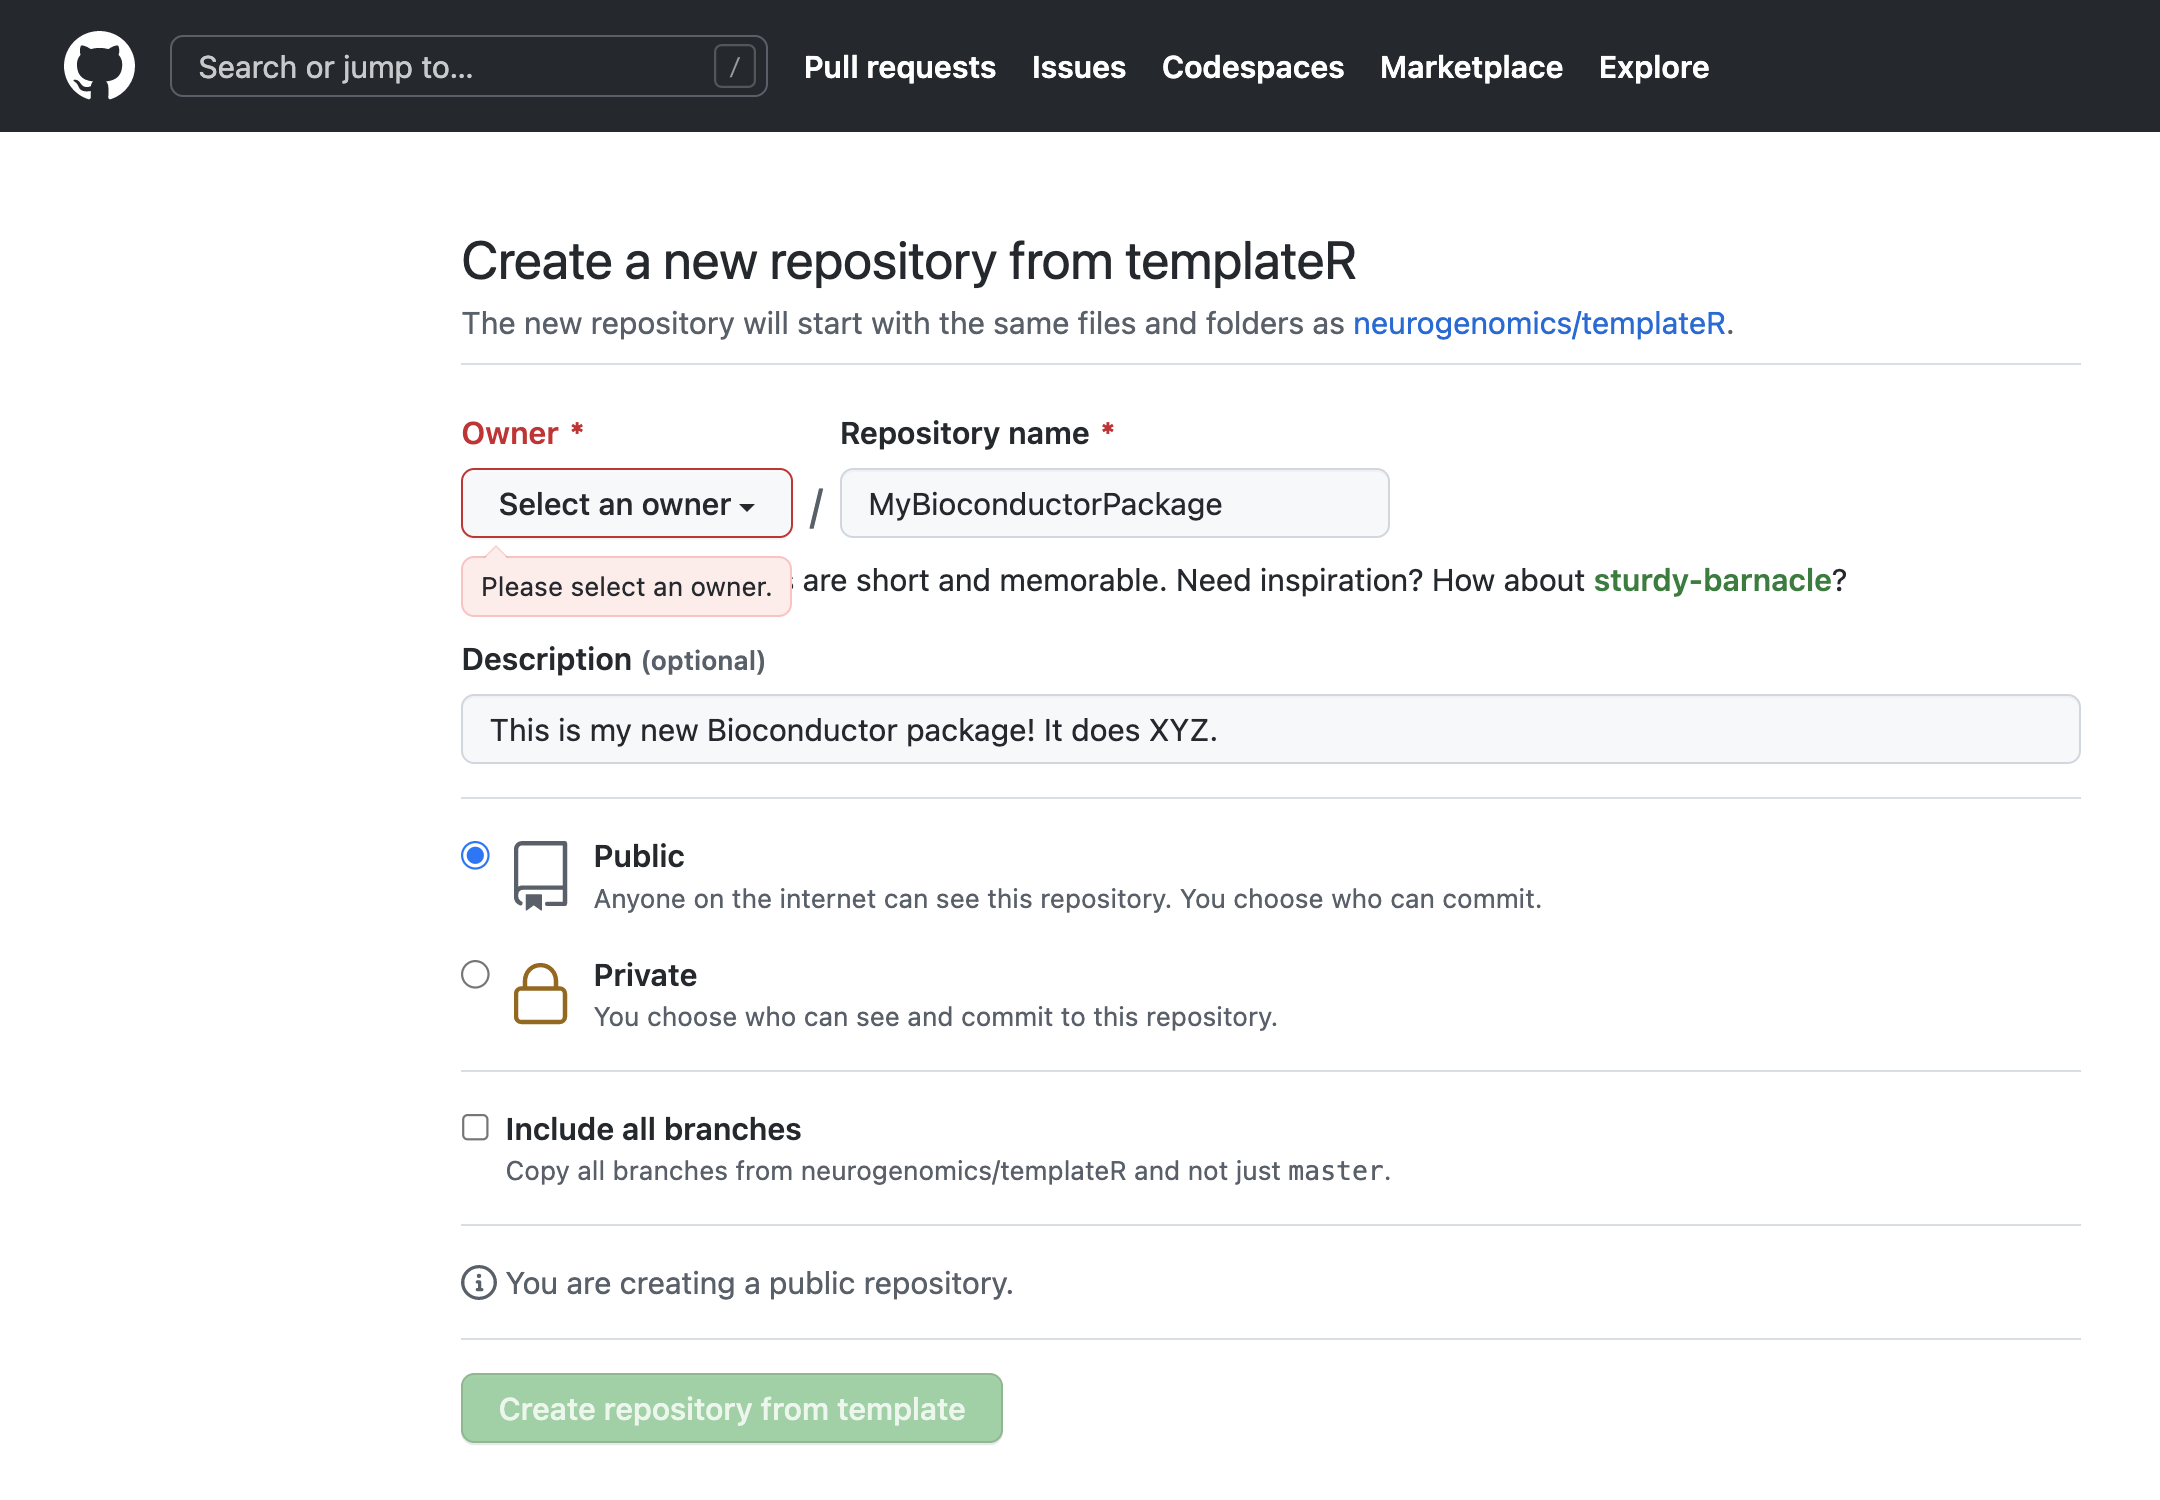
Finally, clone the repo to your local machine.
How to clone
In your new repository created from the template,
click the green [<> Code] button and copying the HTTPS URL.
Then enter git clone <URL> into your command line terminal.
It should look something like this:
git clone https://github.com/OwnerName/MyBioconductorPackage.gitNow you can create a project within Rstudio and start working on your new package!
6.4.2 Using usethis + biocthis
When we are satisfied with the name of your package, we use the function
usethis::create_package() to create a package template.
In this example, we first change directory to ~/Desktop, to initialise the
directory that contains the new package on the Desktop.
Instead, you will likely prefer to initialise your package in your own preferred
directory on your computer.
setwd("~/Desktop")
usethis::create_package("MyBioconductorPackage")
The R console displays some information as the package template is created. In this example, we saw:
✔ Creating 'MyBioconductorPackage/'
✔ Setting active project to '/Users/kevin/Desktop/MyBioconductorPackage'
✔ Creating 'R/'
✔ Writing 'DESCRIPTION'
Package: MyBioconductorPackage
Title: What the Package Does (One Line, Title Case)
Version: 0.0.0.9000
Authors@R (parsed):
    * First Last <first.last@example.com> [aut, cre] (YOUR-ORCID-ID)
Description: What the package does (one paragraph).
License: `use_mit_license()`, `use_gpl3_license()` or friends to
    pick a license
Encoding: UTF-8
Roxygen: list(markdown = TRUE)
RoxygenNote: 7.1.2
✔ Writing 'NAMESPACE'
✔ Writing 'MyBioconductorPackage.Rproj'
✔ Adding '^MyBioconductorPackage\\.Rproj$' to '.Rbuildignore'
✔ Adding '.Rproj.user' to '.gitignore'
✔ Adding '^\\.Rproj\\.user$' to '.Rbuildignore'
✔ Opening '/Users/kevin/Desktop/MyBioconductorPackage/' in new RStudio session
✔ Setting active project to '<no active project>'
The RStudio application then reloads and opens the RStudio project on the new package in a new RStudio application window.
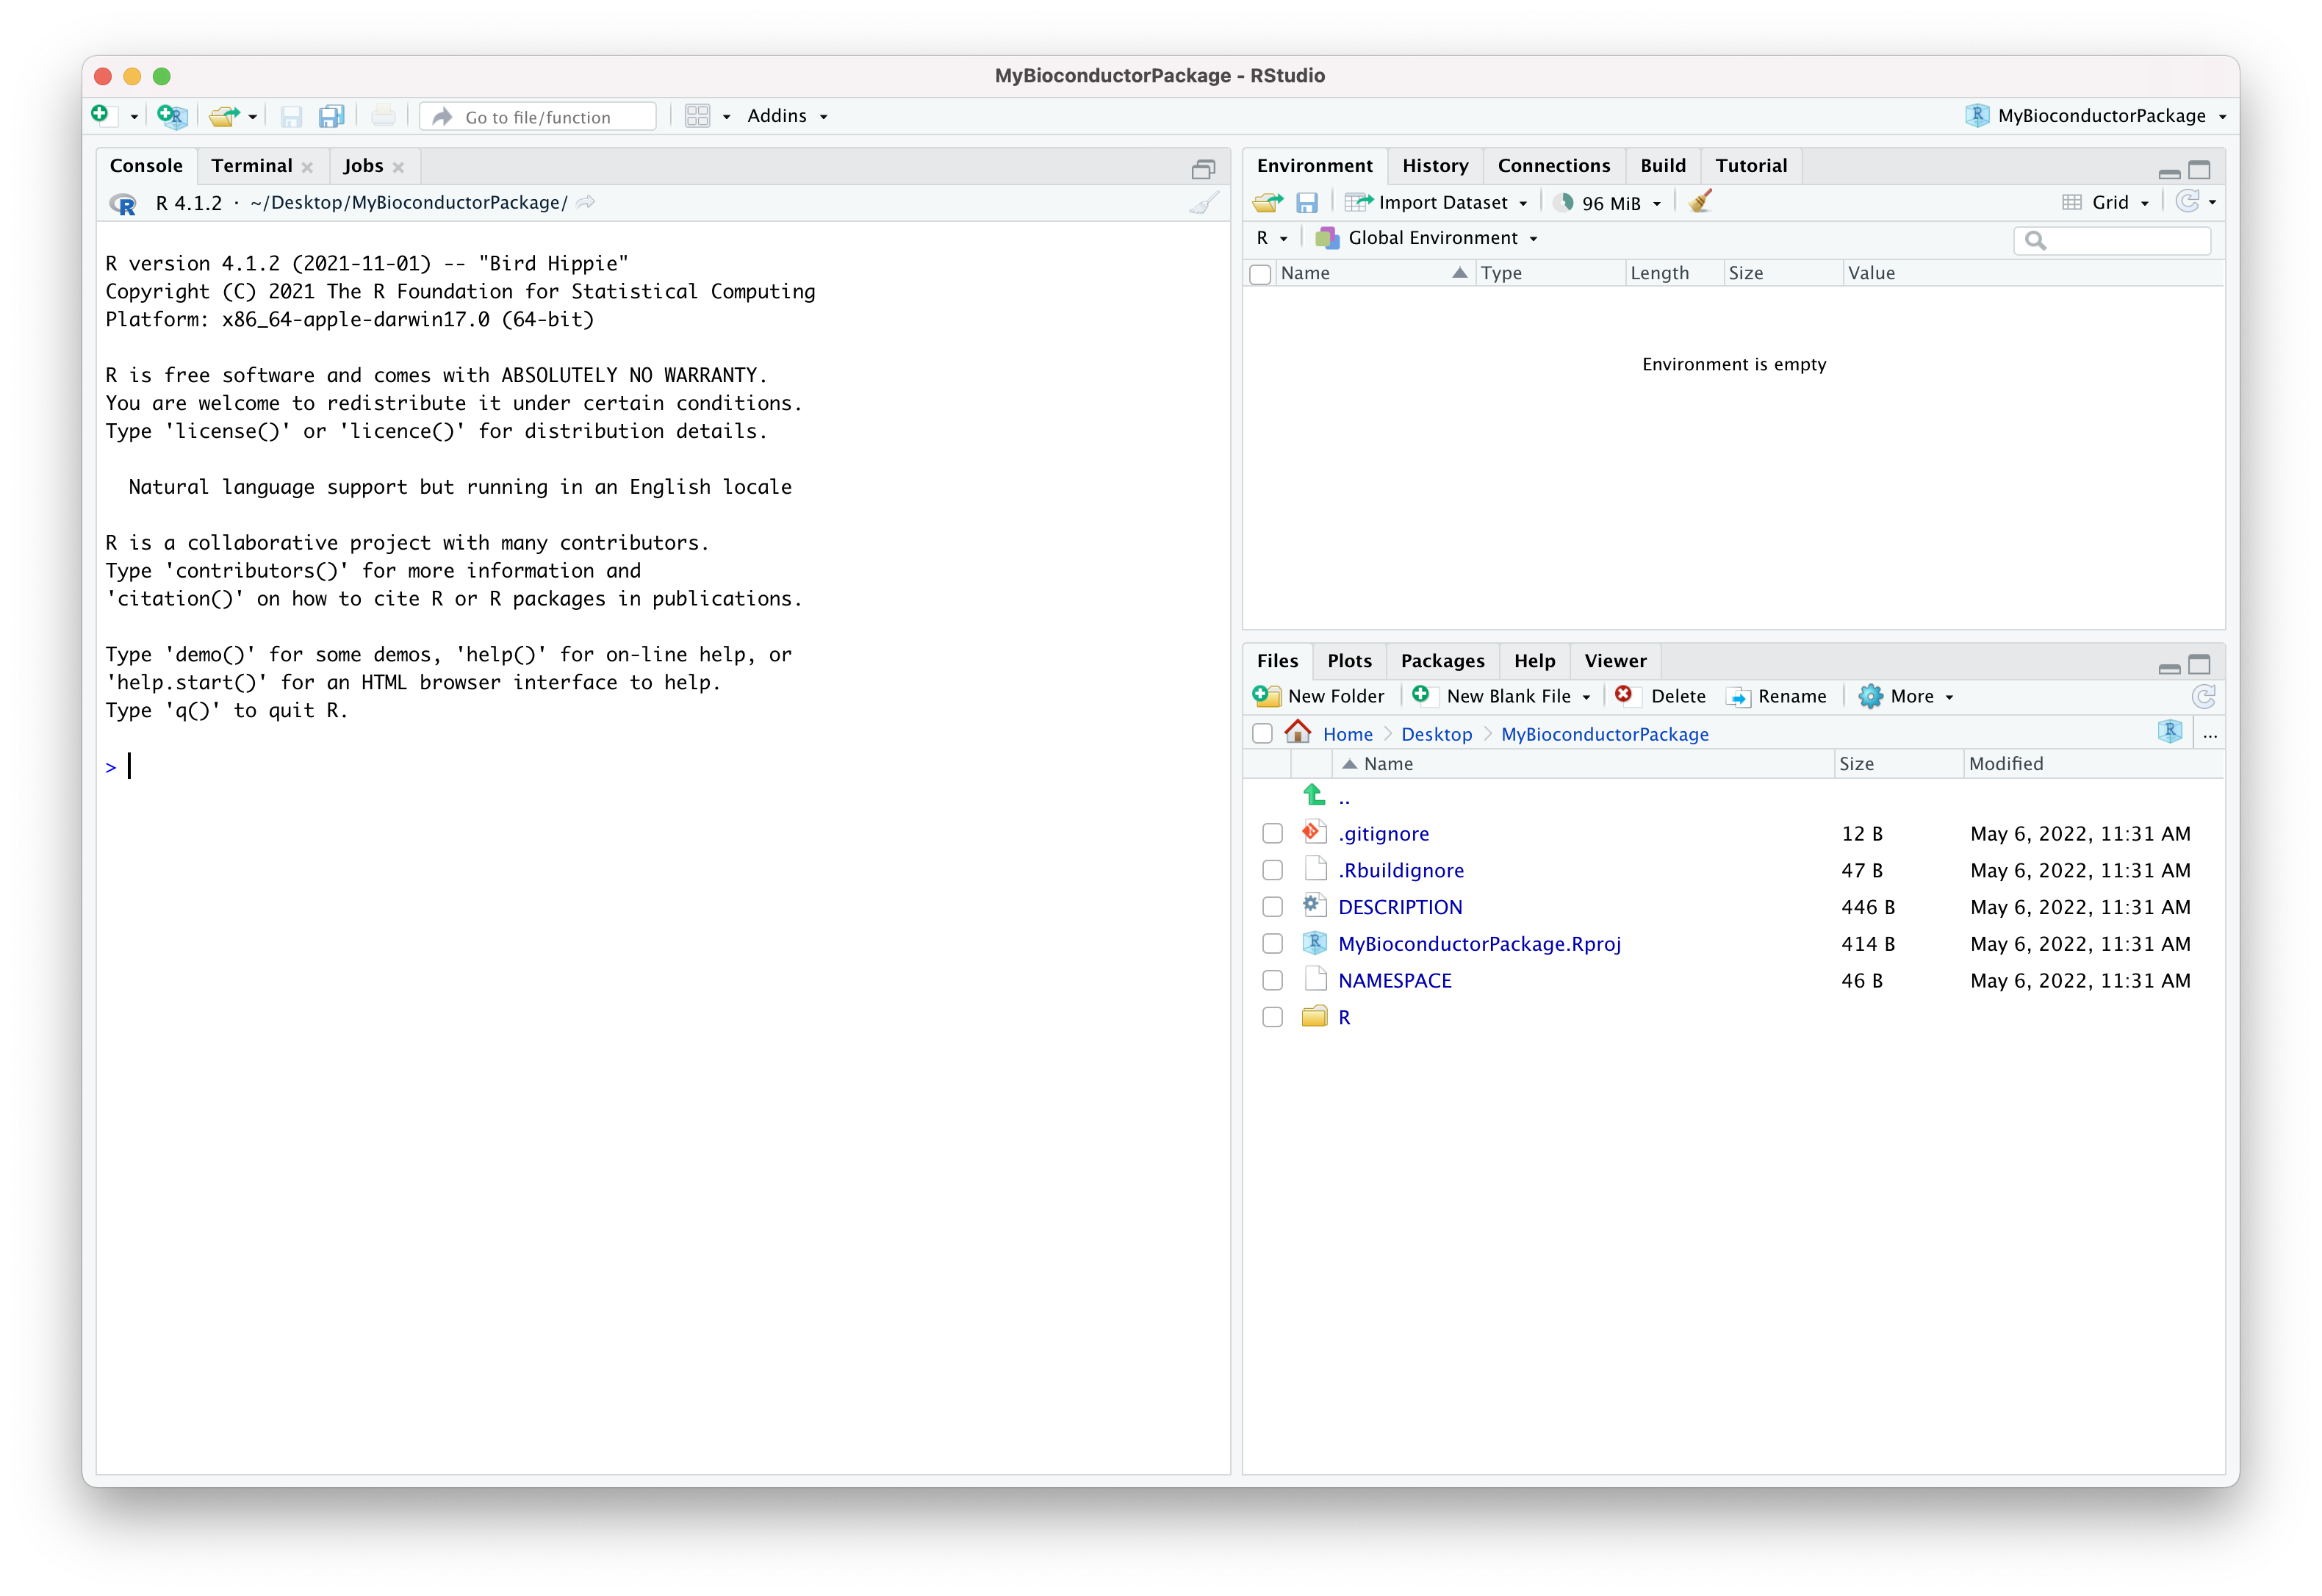
The package template provided by the CRAN package usethis includes some of the essential files that make an R package. Alphabetically:
- The optional file
.gitignoreis used to declare file names and patterns that will be ignored by git version control. - The optional file
.Rbuildignoreis used to declare file names that will be ignored when the package is built. - The essential file
DESCRIPTIONdeclares information about the package, its authors, licensing, and additional information relevant for package development and documentation. - The optional file
MyBioconductorPackage.Rprojis used by the RStudio application to store project settings. - The essential file
NAMESPACEis used to declare functions imported from other packages (i.e., dependencies) and functions exported by the new package. - The essential directory
R/- initially empty - is used to store R scripts that contain the code of the new package.
6.4.2.1 Create template scripts
At this point, we use the Bioconductor package biocthis to generate some R scripts with the goal of helping automate the process of creating R packages for Bioconductor or making them Bioconductor-friendly.
biocthis::use_bioc_pkg_templates()The R console display information are a sub-directory dev/ and several R
scripts are created.
✔ Setting active project to '/Users/kevin/Desktop/MyBioconductorPackage'
✔ Creating 'dev/'
✔ Adding '^dev$' to '.Rbuildignore'
✔ Writing 'dev/01_create_pkg.R'
• Modify 'dev/01_create_pkg.R'
✔ Writing 'dev/02_git_github_setup.R'
• Modify 'dev/02_git_github_setup.R'
✔ Writing 'dev/03_core_files.R'
• Modify 'dev/03_core_files.R'
✔ Writing 'dev/04_update.R'
• Modify 'dev/04_update.R'
In the next sections, we will go through those R scripts in turn.
6.4.2.2 Create the R package
Open the file dev/01_create_pkg.R.
Carefully read the contents of the file, including comments and code, as we have run most of that code already in the previous steps.
In this example, we have already run all the code in that script, so we can
directly open the file dev/02_git_github_setup.R.
We can click on the tab of the file already open in the Source panel of the
RStudio application, or we can run the last line of code in the script
dev/01_create_pkg.R.
rstudioapi::navigateToFile(usethis::proj_path("dev", "02_git_github_setup.R"))6.4.2.3 Exclude files from git version control
In this example, the first step in the script 02_git_github_setup.R is
to add a line in the file .gitignore, declaring that any file ending with the
extension .Rproj should be ignored from git version control.
We also add a nother line declaring that the sub-directory dev/ should also
be ignored.
Packages submitted to the Bioconductor repository should not contain files with
the Rproj extension, as those files are only useful on the computer of package
developers using the RStudio application.
Those files have no use on the Bioconductor repository.
The sub-directory dev/ also does not belong on the Bioconductor repository.
The only purpose of R scripts in that sub-directory is to set up a template for
the new package on the computer of the package developer.
When the template is set up, those scripts and the sub-directory can all be
safely removed.
usethis::use_git_ignore("*.Rproj")
usethis::use_git_ignore("dev/")
If you wish to visualise the change, you can open the file .gitignore.
You will see that the last two lines of the file now declare *.Rproj and
dev/.
6.4.2.4 Set up git
Next, the script gives us the command to set up git version control for the new package.
Version control is fundamental to durable software development. It allows package developers to track incremental changes made to the package, revert mistakes, and collaborate with other developers working simultaneously on the same package.
A git repository can be initialised on the command line in a Unix terminal. However, the CRAN package usethis provides a function to automate this process from the R console.
usethis::use_git()In this example, we are prompted whether we wish to commit some of the files that were created. We choose the option to consent, and press the Return key to confirm.
There are 4 uncommitted files:
* '.gitignore'
* '.Rbuildignore'
* 'DESCRIPTION'
* 'NAMESPACE'
Is it ok to commit them?

1: Yeah
2: No way
3: Not now

Selection: 1
✔ Adding files
✔ Making a commit with message 'Initial commit'
When prompted to restart the RStudio application, we choose the option to consent and press the Return key confirm.
• A restart of RStudio is required to activate the Git pane
Restart now?

1: Absolutely not
2: No way
3: Yup

Selection: 3
Once the RStudio application has restarted, we can see the Git tab in the
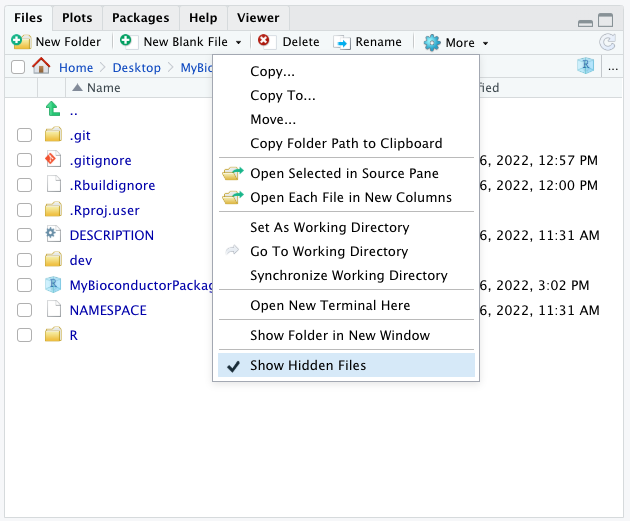
version control panel, and a .git sub-directory in the Files pane.
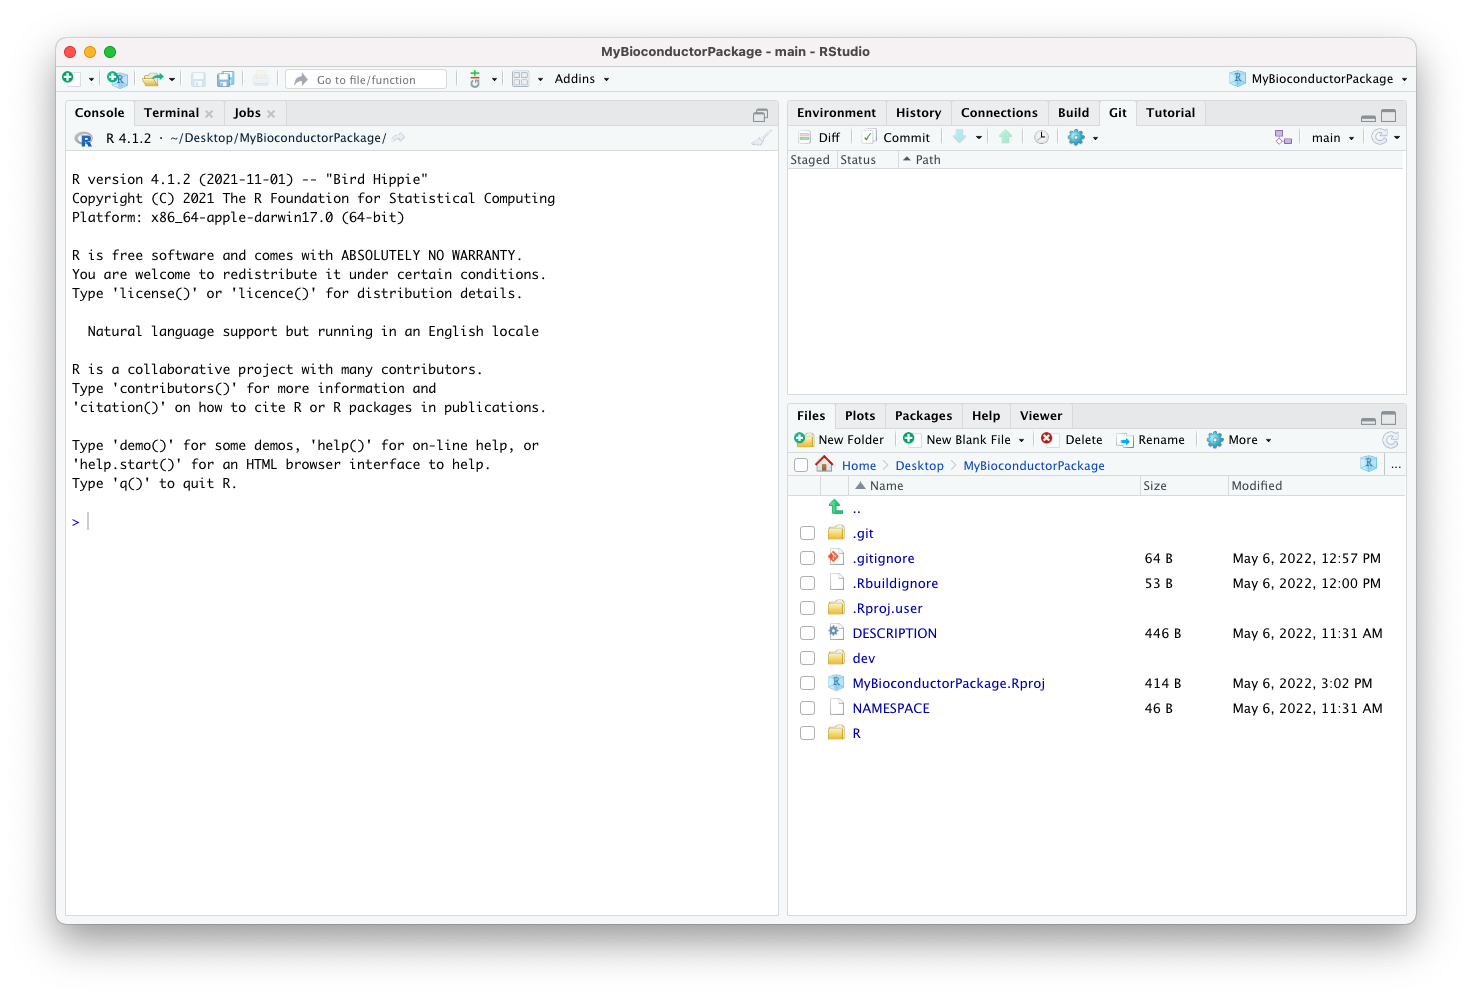
Note:
- The
.gitsub-directory may not be visible until you enable the option toShow Hidden Files.
6.4.2.5 Connect the git repository to GitHub
The GitHub website provides a platform to build, ship, and maintain software, free of charge for public repositories.
A GitHub repository can be created interactively on the GitHub website. However, the CRAN package usethis provides functionality to automate this process from the R console.
Part of the process adds a couple of lines in the file DESCRIPTION,
declaring URLs for the landing page of the repository, and the web page where
issues can be reported.
When prompted whether we wish to commit the changes, we choose the option to
consent, and press the Return key to confirm.
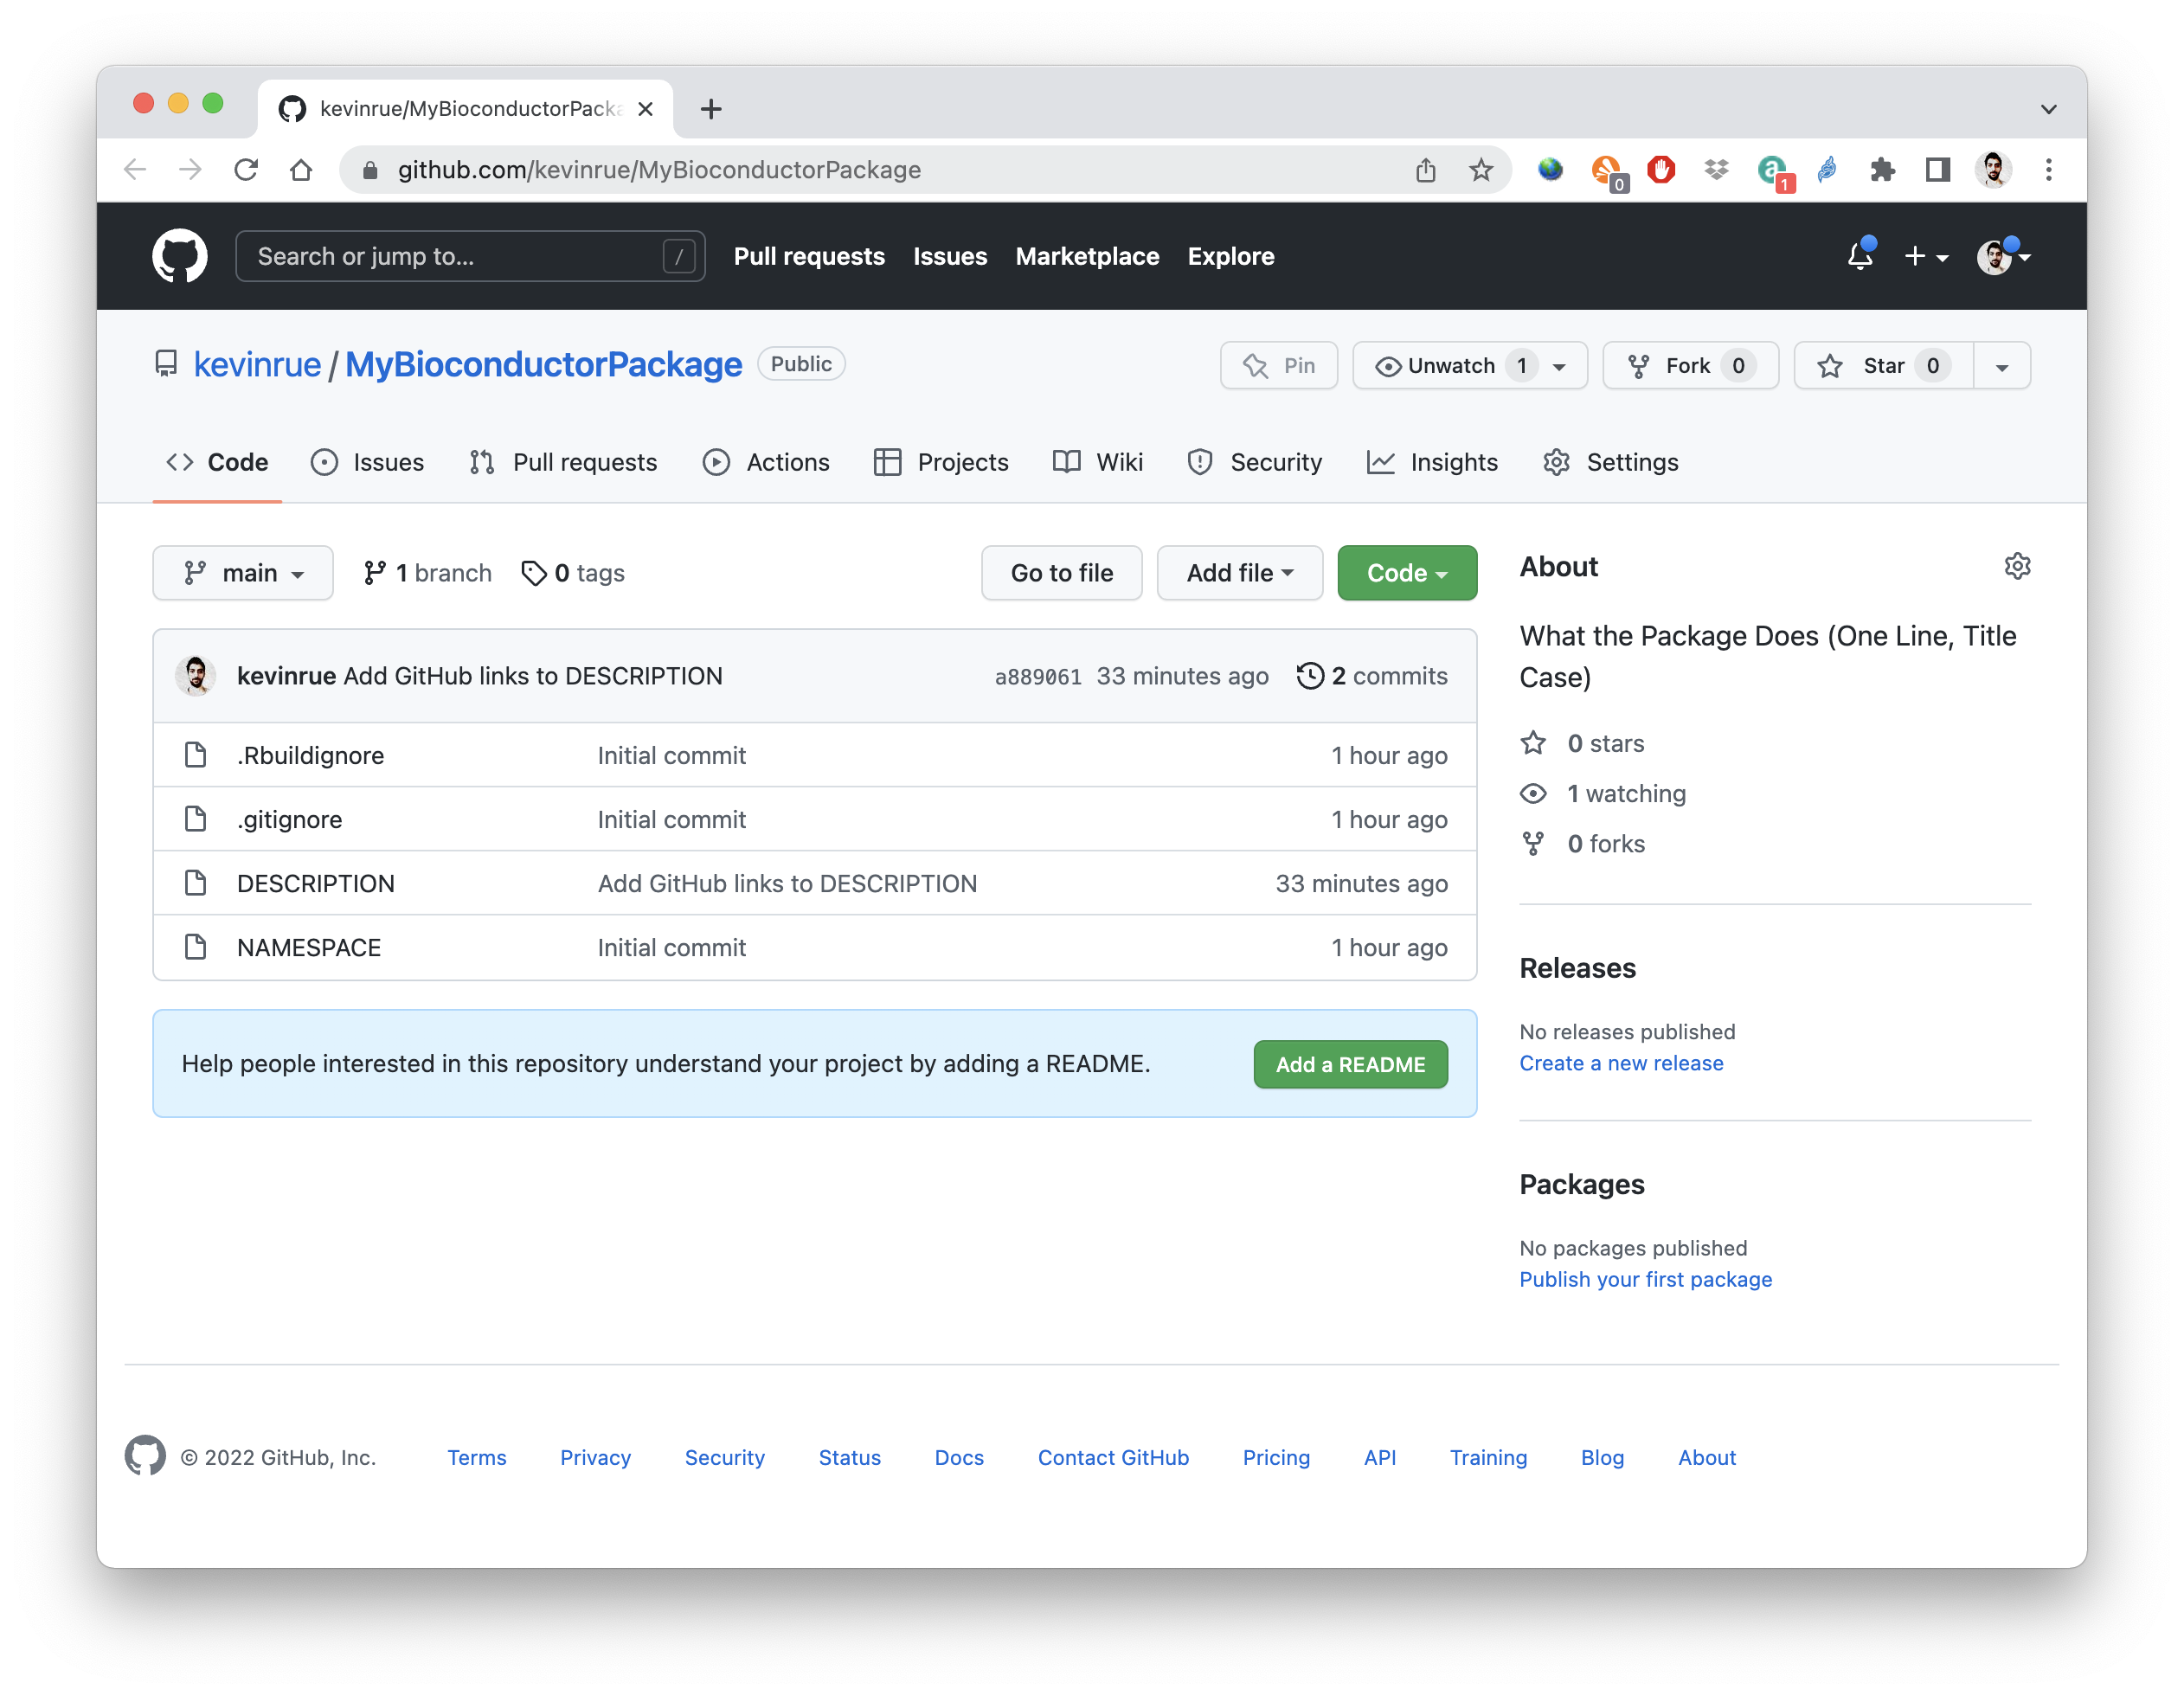
usethis::use_github()✔ Creating GitHub repository 'kevinrue/MyBioconductorPackage'
✔ Setting remote 'origin' to 'git@github.com:kevinrue/MyBioconductorPackage.git'
✔ Setting URL field in DESCRIPTION to 'https://github.com/kevinrue/MyBioconductorPackage'
✔ Setting BugReports field in DESCRIPTION to 'https://github.com/kevinrue/MyBioconductorPackage/issues'
There is 1 uncommitted file:
* 'DESCRIPTION'
Is it ok to commit it?
1: Absolutely not
2: Not now
3: Yup
Selection: 3
✔ Adding files
✔ Making a commit with message 'Add GitHub links to DESCRIPTION'
✔ Pushing 'main' branch to GitHub and setting 'origin/main' as upstream branch
✔ Opening URL 'https://github.com/kevinrue/MyBioconductorPackage'Note:
- If this is your first time running
use_github(), the script provides you some additional commands that you may need to run before the command above can be run successfully. However, that level of detail is beyond the scope of this chapter.
Once the command completes,it automatically opens the landing page of the new GitHub repository in our default web browser.
6.5 Edit the DESCRIPTION file
The DESCRIPTION file is essential to any R package and contains metadata about
the package’s name, description, and software dependencies, etc.
Bioconductor-specific fields:
Bioconductor requires an additional field named biocViews.
The field must be populated by terms selected from a controlled vocabulary,
to facilitate the thematic classification of the new package on the Bioconductor
website.
The full list of available biocViews can be navigated
here.
6.5.1 Setup
6.5.1.1 Using rworkflows
If you used the templateR method above for creating the package template,
you can use the function rworkflows::fill_description()
to update as many of the fields in the default DESCRIPTION as you prefer.
Whichever arguments are not specified by the user are automatically
set to reasonable defaults.
The only required arguments are:
* package: The name of your R package.
* title: The title of your R package.
* description: The description of your R package.
* github_owner: The owner of your R package’s GitHub repository
(you can set this to NA if this is not applicable to your package).
For more detailed guidance on how to fill out these fields, please see below.
6.5.1.2 Using usethis + biocthis
Open the file dev/03_core_files.R and follow the instructions.
The first comment in the script recommends to edit the file DESCRIPTION.
Great sources of information for best practices on that subject are:
Before we start editing any of the fields, we use the function
biocthis::use_bioc_description() to add two more fields.
Separately, an optional field named Date can also be added to the file
DESCRIPTION. If available, that field is used for generating the package
citation information.
Both fields are added and automatically filled by the function
biocthis::use_bioc_description().
biocthis::use_bioc_description()When prompted whether to over-write the pre-existing file DESCRIPTION, we
choose the answer to consent and press the Return key.
The console then displays the contents of the updated file DESCRIPTION.
✔ Setting active project to '/Users/kevin/Desktop/MyBioconductorPackage'
Overwrite pre-existing file 'DESCRIPTION'?

1: Negative
2: No
3: Definitely

Selection: 3
✔ Writing 'DESCRIPTION'
Package: MyBioconductorPackage
Title: What the Package Does (One Line, Title Case)
Version: 0.99.0
Date: 2022-05-10
Authors@R (parsed):
    * First Last <first.last@example.com> [aut, cre] (YOUR-ORCID-ID)
Description: What the package does (one paragraph).
License: Artistic-2.0
URL: https://github.com/kevinrue/MyBioconductorPackage
BugReports:
    https://support.bioconductor.org/t/MyBioconductorPackage
biocViews: Software
Encoding: UTF-8
Roxygen: list(markdown = TRUE)
RoxygenNote: 7.1.2
6.5.2 Package name
Now we open the file DESCRIPTION and carefully examine each field.
First, the field Package already contains the name that we have chosen for our
new package.
Package: MyBioconductorPackageNote:
- If you decide to change the package name from this point onward, you should be
mindful of all the other places where you will need to also update that name
(though this is less of a concern when using
templateR).
6.5.3 Package title
Next, the field Title is the first field that we want to update from the
default placeholder.
Note that this field expects a single line in
title case,
where all words are capitalized except for minor words.
In this example, we go with Demonstration of a Bioconductor Package.
In doubt, you can always look at some of your favourite packages for
inspiration.
Title: Demonstration of a Bioconductor Package6.5.4 Package version
Next, the field Version must be set to either version 0.99.0 or any
version number that is semantically lower than that.
This is because 0.99.0 is the version number that is expected in package
submitted to the Bioconductor repository, and version numbering should never
go backward.
In this example, we leave the version 0.99.0 that was automatically set by the
function biocthis::use_bioc_description(), as we do not expect to change
that version number ever in the future.
You might want to pick a lower version number, if you wish to
increment version numbers during your work on the package before your first
submission to the Bioconductor project (e.g., 0.1.0 -> 0.2.0 -> 0.2.1).
Version: 0.99.06.5.5 Package date
Next, we leave the field Date to the date of today, that was automatically
filled by the function biocthis::use_bioc_description().
Date: 2022-05-106.5.7 Package description
Next, the field Description must also be changed to provide a longer
description of the package, albeit general guidelines recommend to keep the
length of that field to a single paragraph.
For instance, in this case we choose to write:
Description: This package demonstrates the set up of a Bioconductor-friendly
    package using the packages usethis and biocthis. The setup includes the
    initialisation of a git repository as well as the connection of the local
    repository to the GitHub website.
Note:
- Best practices encourage us to wrap the contents of the field over multiple
lines, in a way that each line of the file
DESCRIPTIONdoes not exceed 80 characters, and each line from the second one is indented by four spaces.
6.5.8 Package license
Next, the field License declares the licensing choice made by the copyright
holder of the package.
Bioconductor packages are often licensed under Artistic-2.0, although
a number of other choices are commonly accepted for community-contributed
packages (e.g. GPL-3).
For help choosing which license is right for your package, please see these resources provided by GitHub and choosealicense.com
In this example, we leave the Artistic-2.0 license automatically set by the
function biocthis::use_bioc_description().
License: Artistic-2.06.5.9 Package URL and BugReports
The next two fields of the file are URL and BugReports,
which were recently added by the function usethis::use_github() and
subsequently edited by the function biocthis::use_bioc_description().
URL: https://github.com/<OwnerName>/<MyBioconductorPackage>
BugReports: https://github.com/<OwnerName>/<MyBioconductorPackage>/issues
Although this demonstration package may never be actually included in the
Bioconductor repository, we decide to leave the BugReports field to a URL
directing to the Bioconductor support site,
as it is a great source of information from fellow package users and developers.
6.5.10 Package Depends
The Depends field specifies the system dependencies of the R package.
At a minimum, you must specify the subversion of R (e.g. R (>=4.2)).
rworkflows::fill_description() automatically fill in the appropriate version of R
for the current Bioconductor development version.
You can also call the rworkflows::bioc_r_versions() directly to assist you in determining the appropriate version of R based on the official requirements set for a Bioconductor release.
versions <- rworkflows::bioc_r_versions(bioc_version = "devel",
                                        depth = 2)
versions$bioc # e.g. 3.17
versions$r # e.g. 4.3
6.5.11 Package Imports
The Imports field is used to specify other R packages that are required for your R package to work.
rworkflows::fill_description() automatically infers this field based on the function calls within your R package’s code.
You can also call the rworkflows::infer_deps() directly to have more refined control over which packages get assigned to this field, including the ability to manually specify certain Imports via the imports= argument.
rworkflows::infer_deps(which = "Imports",
                       imports = "BiocGenerics")
6.5.12 Package Suggests
The Suggests field is used to specify other R packages that are used infrequently within your R packages. The big difference between Suggests and Imports is that packages under Imports will be installed by default when users install your package, while packages under Suggests will not (unless otherwise specified, e.g. remotes::install_github(..., dependencies = TRUE)).
rworkflows::fill_description() automatically infers this field based on the function calls within your R package’s code.
You can also call the rworkflows::infer_deps() directly to have more refined control over which packages get assigned to this field, including the ability to manually specify certain Suggests via the suggests= argument.
rworkflows::infer_deps(which = "Suggests",
                       suggests = "htmltools")
6.5.13 Package Remotes
Remotes is a field that specifies where R package dependencies that are not in standard repositories like CRAN or Bioconductor can be installed from.
This can be helpful in several scenarios: 1. Your package requires a development version of a package with bug fixes that have not yet been deployed to Bioconductor/CRAN. 2. Your package requires an R package that is exclusively distributed through GitHub or some other non-standard R package distributor.
Optionally, you can include the @<branch> modifier at the end of the remote
to specify a particular branch of the package’s GitHub repo to install from (e.g. @master, @devel).
Remotes:
  github::lawremi/rtracklayer@master
:warning: NOTE: :warning:
The Remotes field should NOT be used for packages that you plan to release on standard R package repositories like Bioconductor or CRAN as the inclusion of this field will generate an error during code checks. Nevertheless, we describe this field here for comprehensiveness, and because it may be helpful to developers during early stages of creating their R package, or for those who distribute their R packages exclusively through GitHub.
6.5.14 Package biocViews
bioViews are a series of standardised terms used for describing Bioconductor packages.
You can manually browse through the different options available for the bioViews by checking the Bioconductor website here.
Alternatively, you can fill this out automatically using rworkflows::infer_biocviews(),
which automatically scans through your R package’s code and infers the most appropriate biocViews terms. Internally, this calls the biocViews::recommendBiocViews function to infer these terms. This is the default strategy employed by rworkflows::fill_description().
Here is an example of what a filled out biocViews field might look like:
biocViews: Software Genetics Transcriptomics6.5.15 Package Encoding
Next, the field Encoding can usually be left at the default value.
In this example, this is UTF-8.
Encoding: UTF-86.5.16 Package Roxygen and RoxygenNote
Finally, the fields Roxygen and RoxygenNote can usually be left to their
default value.
In this example, those were list(markdown = TRUE) and 7.1.2, respectively.
The former is a list of options passed to the CRAN package
roxygen2 – used to generate manual pages – while
the latter tracks the version of BiocStyle::CRANpkg("roxygen2") that was last
used to manage the documentation in this particular Bioconductor package.
6.5.17 Summary
With that, we have finished out first round of edits to the file DESCRIPTION.
Importantly, we have highlighted many of the fields in this file that are prone
to regular updates as the package continues to be developed:
- the
Versionfield can be updated to create new releases of the package. - the
Datefield should be updated in parallel with theVersionfield, to mark the release date of each version of the package. - the
Authors@Rfield can be edited to update information about existing or new contributors to the package. - the
Descriptionfield can be updated to refine information about the package, for instance as new functionality is added. - the
BugReportsfield can be updated when the package is accepted in the Bioconductor repository. - the
biocViewsfield can be updated to refine the list of terms used to thematically classify the package in the Bioconductor repository.
6.6 Create the README file
Most code repositories include a file named README.md, that often provides
useful information to new users, such as instructions to install the package,
a brief showcase of the package functionality, or preferences for citing the
package.
6.6.1 Using rworkflows
If using the templateR R package template, a README.Rmd is already included.
This file automatically extracts relevant information from the DESCRIPTION file
(e.g. package name, package title, GitHub URL) and fills the README accordingly.
This includes links to the documentation website, installation instructions, and citation information.
To update the resulting README.md file, simply knit the README.Rmd file
(after making any additional changes you would like).
For further details, please see the Build README section.
If you didn’t use the templateR template, you can still generate the dynamically
autofilled README.Rmd using rworkflows::use_readme().
6.6.2 Using usethis + biocthis
In this example, we use function biocthis::use_bioc_readme_rmd() to generate
a template R Markdown file named README.Rmd, that we will adapt to our own
new package before compiling it to a regular Markdown file README.md.
6.6.2.1 Setup
biocthis::use_bioc_readme_rmd()✔ Writing 'README.Rmd'
✔ Adding '^README\\.Rmd$' to '.Rbuildignore'
• Modify 'README.Rmd'
✔ Writing '.git/hooks/pre-commit'The R console displays some information as the file README.Rmd is created.
When the command completes, the file is automatically opened in the Source panel
of the RStudio application, where we can carefully read and edit it as needed.
We see that the initial template contains code that we can expect to fail at this point in time.
6.6.2.2 Installation instructions
First, some of the instructions in the section ## Installation instructions
clearly assume that our new package can be obtained and installed from the
Bioconductor repository.
if (!require("BiocManager", quietly = TRUE)) install.packages("BiocManager")

BiocManager::install("MyBioconductorPackage")
This is obviously not the case yet, and those instructions would cause an error for anyone attempting to run that code. While we could decide to remove those currently invalid instructions, it is acceptable to keep them as a placeholder, as they indicate our intention to submit that package to the Bioconductor repository, and those command will be valid when the package is accepted and included in the Bioconductor repository.
In the meantime, you can provide alternative instructions to install you package directly from GitHub (where “OwnerName” is the name of the account in which the GitHub repo resides):
if (!require("remotes", quietly = TRUE)) install.packages("remotes")

remotes::install_github("OwnerName/MyBioconductorPackage")
6.6.2.3 Example
Similarly, the section ## Example demonstrates how to load the package, as
well as running some code that is currently unrelated to our new package.
Since our package does not contain any code yet, we do not have any code to demonstrate the functionality of the package itself. Again, it is acceptable to keep that part of the template as a placeholder and a reminder that as our new package matures, we should use this section to briefly demonstrate how to use the package.
Again, the rest of this template file describes aspects of the package that are not in place yet. In this example, we choose to keep this template file exactly as it was generated, as there is nothing that needs urgent attention or editing.
6.6.2.4 Build README
Following the next set of instructions in the script 03_core_files.R, we use
the function devtools::build_readme() to compile the R Markdown file
README.Rmd into a Markdown file README.md.
devtools::build_readme()ℹ Installing MyBioconductorPackage in temporary library
ℹ Building /Users/kevin/Desktop/MyBioconductorPackage/README.Rmd
Loading required namespace: MyBioconductorPackageThe console displays some information, as our package is temporarily installed for the duration of the command.
When the command completes successfully, we see the newly created file
README.md.
We can open that file, and see that it contains the regular Markdown contents
from the original README.Rmd source file, as well as the output of the code
chunks that were executed during compilation.
The takeaway from this section is that the file README.md is ultimately the
target file that we want to produce.
However, the README.Rmd is a convenient way to include example code that can
be automatically executed, with the results embedded directly into the file README.md without any additional work on our part.
All that we need to remember is to re-compile the file README.md every time
that we update the source file README.Rmd.
6.7 Create the NEWS file
R packages should include a file named NEWS to keep track of changes to the
code from one version to the next.
A valid alternative is the the file NEWS.md.
In this example, we use the function biocthis::use_bioc_news_md() to create
a template file that we can examine and edit as needed.
biocthis::use_bioc_news_md()The R console displays some information as the file NEWS.md is created.
When the command completes, the file is automatically opened in the Source panel
of the RStudio application.
✔ Writing 'NEWS.md'
• Modify 'NEWS.md'
In this example, the file contains an entry that starts with a first level heading that declares the package name and current version.
Next, the template contents includes three sections, each with a single bullet point.
In this example, we keep only the first section that declares the creation of
the file NEWS.md.
We delete the next two sections, as their contents does not describe anything
relevant to our work so far.
The final contents of the file NEWS.md in this example are shown below.
# MyBioconductorPackage 0.99.0

NEW FEATURES

* Added a `NEWS.md` file to track changes to the package.
The takeaway from this section is that the file NEWS.md should be regularly
updated to briefly describe changes introduced in each new version of the
package.
New entries should be added at the top of the file, resulting in a reverse chronological order. There is no restriction on the name of sections within each entry. For future reference, the sections used in the initial template were:
NEW FEATURESSIGNIFICANT USER-VISIBLE CHANGESBUG FIXES
Those sections cover most of the situations, but you are free to use different section titles that may better fit your needs.
6.8 Create a Bioconductor-styled code of conduct
The Bioconductor project declares a code of conduct that community members are expected to respect when participating in community events and communicating on community platforms (e.g., support site, Slack workspace).
In this example, we use the function biocthis::use_bioc_coc() to generate
a template file indicating that our new package subscribes to that code of
conduct.
biocthis::use_bioc_coc()The R console displays information as files are created and edited.
In particular, when the command completes, our clipboard contains some text
that we can add to the file README.Rmd.
✔ Creating '.github/'
✔ Adding '^\\.github$' to '.Rbuildignore'
✔ Adding '*.html' to '.github/.gitignore'
✔ Writing '.github/CODE_OF_CONDUCT.md'
• Don't forget to describe the code of conduct in your README:
  ## Code of Conduct
  Please note that the MyBioconductorPackage project is released with a [Contributor Code of Conduct](http://bioconductor.org/about/code-of-conduct/). By contributing to this project, you agree to abide by its terms.
  [Copied to clipboard]
In this example, we open the file README.Rmd and paste the contents of the
clipboard at the end of the file.
Importantly, we remember to re-compile this file README.Rmd to update the
target file README.md.
devtools::build_readme()From the information displayed in the R console, we also learn that a
sub-directory named .github was created, and a file named CODE_OF_CONDUCT.md
was created within that new sub-directory.
We can take a moment to open that new file and examine its contents.
The Bioconductor community values

* an open approach to science that promotes the sharing of ideas, code, and expertise
* collaboration
* diversity and inclusivity
* a kind and welcoming environment
* community contributions

In line with these values, Bioconductor is dedicated to providing a welcoming, supportive, collegial, experience free of harassment, intimidation, and bullying regardless of:

* identity: gender, gender identity and expression, sexual orientation, disability, physical appearance, ethnicity, body size, race, age, religion, etc.
* intellectual position: approaches to data analysis, software preferences, coding style, scientific perspective, etc.
* stage of career

In order to uphold these values, members of the Bioconductor community are required to follow the Code of Conduct.The latest version of Bioconductor project Code of Conduct is available at http://bioconductor.org/about/code-of-conduct/. Please read the Code of Conduct before contributing to this project.

Thank you!
In this example, we decide to keep the contents of the template file as they are.
6.9 Create a guide for contributions
Optionally, R packages are welcome to include a file .github/CONTRIBUTING.md.
That file is used to inform potential contributors to the package of our
preferences to receive and handle such contributions.
In this example, we use the function usethis::use_tidy_contributing() to set
up a template file that we can examine and edit as needed.
usethis::use_tidy_contributing()The R console displays information as the file .github/CONTRIBUTING.md is
created.
✔ Writing '.github/CONTRIBUTING.md'That template file is relatively long to display here, so we encourage you to carefully inspect the one that is create when you run the command above, and edit it as needed. In this example, we keep the contents of the template file as they are.
6.10 Create a guide for getting support
Another optional file that may be added to Bioconductor packages is
.github/SUPPORT.md.
That file is used to inform users of the package about sources of information
and help when they experience difficulties while using the package.
In this example, we use the function biocthis::use_bioc_support() to set
up a template file that we can examine and edit as needed.
biocthis::use_bioc_support()The R console displays information as the file .github/SUPPORT.md is
created.
✔ Writing '.github/SUPPORT.md'That template file is relatively long to display here, so we encourage you to carefully inspect the one that is create when you run the command above, and edit it as needed. In this example, we keep the contents of the template file as they are.
6.11 Create a GitHub issue template
Bioconductor packages maintained on GitHub benefit of a web page for reporting issues about the package, typically identified by users or developers of packages that depend on the functionality provided by this package.
By default, the form for reporting issue is entirely blank, leaving users to decide what information they think is sufficient to describe their issue. GitHub repositories have the possibility of including template forms designed to guide users in identifying and reporting all the information relevant to their issue.
Instead, can be helpful (to both developers and users) to provide users with a template for Issues. Useful information often involves a minimal reproducible example, including a small data set that is either publicly available or simulated by some code, alongside the code that is either throwing an error, or producing an unexpected output.
6.11.1 Using rworkflows
rworkflows::use_issue_template() provides several pre-created Issues templates,
which it will copy into the correct subfolder structure for you. Templates include:
- bug_report.md: A guide for users on how to report bugs in a way that is designed to minimise miscommunications and back-and-forth troubleshooting.
- feature_request.md: A standard template for users to request new or expanded features within your R package.
rworkflows::use_issue_template(templates = c("bug_report.md", "feature_request.md"))
6.11.2 Using usethis + biocthis
In this example, we use the function biocthis::use_bioc_issue_template()
to create a new sub-directory .github/ISSUE_TEMPLATE and a template file
issue_template.md within that new sub-directory.
biocthis::use_bioc_issue_template()The R console displays some information as directories and files are created. When the command completes, we can open the newly created file, to examine and edit it as needed.
✔ Creating '.github/ISSUE_TEMPLATE/'
✔ Writing '.github/ISSUE_TEMPLATE/issue_template.md'
In this example, we decide to keep the original contents as they are.
6.12 Create a CITATION template
Optionally, R packages can contain a file inst/CITATION, that provides
information encouraging and guiding users wishing to cite an article or book
related to the package.
6.12.1 Using rworkflows
A standard CITATION file is included within the inst subdirectory
of the templateR R package template.
Simply update this file with your R package’s citation information
in any text editor (including Rstudio).
6.12.2 Using usethis + biocthis
In this example, we use the function biocthis::use_bioc_citation()
to create a new sub-directory inst and a template file CITATION
within that new sub-directory.
biocthis::use_bioc_citation()The R console displays some information as directories and files are created.
When the command completes, the file inst/CITATION is automatically opened
in the Source panel of the RStudio application where we can examine and edit
the contents of the file as needed.
✔ Creating 'inst/'
✔ Writing 'inst/CITATION'
• Modify 'inst/CITATION'
In this example, we edit the required argument title= of the two calls to the function bibentry() to "Demonstration of a Bioconductor Package" (which is
also the title of the package that we declared in the file DESCRIPTION).
At this point, we remember that the README.Rmd file demonstrates how to cite
the package.
As a consequence, we need to re-compile the file README.Rmd to update the file
README.md.
devtools::build_readme()When the command completes, we can take the time to open the file README.md
and examine the new contents in the section ## Citation.
6.13 Add badges to the README file
Optionally, status badges can be added to the README.Rmd file, and displayed
in the README.md file.
6.13.1 Using rworkflows
rworkflows::use_badges() makes generating many different types of badges at once very easy by wrapping them into a single R function. Which badges are included is fully customisable through arguments. This means that you don’t have to worry about manually updating badges each time some aspect of your package changes.
It can also generate code to display images like hex stickers within GitHub markdown files (e.g. README.md). By default, it searches for a hex sticker named inst/hex/hex.png within the GitHub repository, you can can also specify a custom path by supplying add_hex with a character string instead (e.g. add_hex="path/to/mysticker.png"). If no such hex sticker exists, this step will be gracefully skipped.
Here, the ref arg refers to the owner/name of your R package’s GitHub repository.
See ?rworkflows::use_badges for a full list of all arguments and a description of each one.
rworkflows::use_badges(ref = "OwnerName/MyBioconductorPackage",
                       add_doi = "10.1111/2041-210X.12628",
                       add_lifecycle = "experimental",
                       add_hex = TRUE,
                       add_commit = TRUE,
                       add_github_version = TRUE,
                       add_bioc_release = TRUE,
                       add_bioc_download_rank = TRUE,
                       add_bioc_download_month = TRUE,
                       add_actions = "rworkflows",
                       add_codecov = TRUE,
                       add_codecov_graphs = "icicle",
                       add_authors = TRUE
                       )
6.13.2 Using usethis + biocthis
Lifecycle badges are popular to inform package users about the level of maturity that they can expect from the package. Packages in the earliest stages of development – as in our current example – tend to be updated frequently, as new experimental functionality is regularly added, while bugs are being identified and fixed. Conversely, package at later stages of development tend to be more stable, allowing users to expect more reliability from the package functionality and a relatively fixed set of best practices.
In this example, we use the function usethis::use_lifecycle_badge() to declare
that our new package is still at an early stage of development and should be
considered with care by our users.
usethis::use_lifecycle_badge("Experimental")The R console displays some information as the file README.Rmd is edited to
embed the new badge.
✔ Adding Lifecycle: experimental badge to 'README.Rmd'
• Re-knit 'README.Rmd'
As a consequence of the update to the file README.Rmd, we need to re-compile
that file to apply the changes to the file README.md.
devtools::build_readme()When the command completes, we can take the time to open the file README.md
and examine the new line in the badges section.
<!-- badges: start -->
...
[](https://lifecycle.r-lib.org/articles/stages.html#experimental)
<!-- badges: end -->The next command in the script 03_core_files.R demonstrates the function usethis::use_github_actions_badge().
GitHub Actions is a optional functionality of the GitHub website that makes it easy to automate workflows related to software development, including regular building, testing, and deployment of the code hosted in GitHub repositories.
In this example, we use the function usethis::use_github_actions_badge() to
add a badge that will display the result of a GitHub Actions workflow for our
new package.
We use the first argument "R-CMD-check-bioc" to declare the name of the
GitHub Actions workflow.
usethis::use_github_actions_badge("R-CMD-check-bioc")The R console displays some information as the file README.Rmd is edited to
embed the new badge.
✔ Setting active project to '/Users/kevin/Desktop/MyBioconductorPackage'
✔ Adding R-CMD-check-bioc badge to 'README.Rmd'
• Re-knit 'README.Rmd'
The last message reminds us to re-compile the file README.Rmd to apply the
update to the file README.md.
devtools::build_readme()Note:
- At the moment, the GitHub Actions workflow itself is not defined.
As a result, the badge may not display properly.
This is entirely normal and acceptable, as the functionality of the package
itself is in no way impacted by the contents of the file
README.md.
6.14 Enable unit tests
Separately from the code that create new functionality in a package, unit tests allow package developers to write additional code that invokes functions defined in the package, and verifies that they produce the expected results in given scenarios.
In this example, we use the function usethis::use_testthat()
usethis::use_testthat()The R console displays some information as sub-directories and files are created and edited.
✔ Adding 'testthat' to Suggests field in DESCRIPTION
✔ Setting Config/testthat/edition field in DESCRIPTION to '3'
✔ Creating 'tests/testthat/'
✔ Writing 'tests/testthat.R'
• Call `use_test()` to initialize a basic test file and open it for editing.
In this example, the file DESCRIPTION is edited to declare that our package
now depends on the CRAN package testthat for writing
and running tests, specifically version 3 of the testthat package.
Suggests:
    testthat (>= 3.0.0)
Config/testthat/edition: 3
Simultaneously, a sub-directory tests and script file tests/testthat.R are
created.
That script is the entry point that is used to start the execution of any test
that we may write in the future.
At the moment, there is not test in the package.
Even though our package does not contain any code that we can test yet,
in this example, we use the function usethis::use_test() to demonstrate the
creation of a test script in the package.
We use the first argument "example_test" to declare the name of the
test file.
usethis::use_test("example_test")The R console displays some information as a sub-directory and a file are created.
✔ Writing 'tests/testthat/test-example_test.R'
• Modify 'tests/testthat/test-example_test.R'
When the command completes, the new file tests/testthat/test-example_test.R
is open in the source panel of the RStudio application.
The script contains an example test that is designed to verify whether
R correctly returns the value 4 when asked to multiply 2 by 2.
test_that("multiplication works", {
  expect_equal(2 * 2, 4)
})
This example is trivial and merely a placeholder that we will ultimately replace by tests specifically tailored to verify that our own package functions behave as expected. For now, it is entirely acceptable to keep this example test, for the purpose of setting up our package infrastructure.
Tied with the notion of tests is the notion of coverage. Coverage is a metric in software testing that measures the fraction of source code in a package that is traversed at least once during the execution the entire series of tests in that package.
6.14.1 Report test coverage
6.14.1.1 Using rworkflows
If you use the rworkflows GitHub Action (see section below),
no additional steps/files are necessary beyond creating your unit tests.
Code coverage will automatically be tested and the results will be uploaded to Codecov.
6.14.1.2 Using usethis + biocthis
In this example, we use the function usethis::use_coverage() to set up files
and default settings for the execution and reporting of test coverage in our
package.
usethis::use_coverage()In this example, the CRAN package covr is not installed yet, so we are prompted to install it first. We choose the option to consent.
ℹ The package `covr` is required.
✖ Would you like to install it?

1: Yes
2: No

Selection: 1
When packages are installed, the command will proceed to create and edit files, displaying information in the R console as it does so.
✔ Adding 'covr' to Suggests field in DESCRIPTION
✔ Writing 'codecov.yml'
✔ Adding '^codecov\\.yml$' to '.Rbuildignore'
✔ Adding Codecov test coverage badge to 'README.Rmd'
• Re-knit 'README.Rmd'
• Call `use_github_action("test-coverage")` to continuously monitor test coverage.
First, the CRAN package covr is added to the
dependencies of our package in the file DESCRIPTION.
Then, a file codecov.yml is created with default options that control the
execution and reporting of the test coverage.
That new file is added to the file .Rbuildignore, to avoid warnings during
future builds of the package.
Another badge is added to the file README.Rmd, for reporting test coverage.
As a result of that last edit, we are reminded to re-compile the file
README.Rmd, to apply the updates to the file README.md.
devtools::build_readme()6.15 Create a template vignette
Package vignettes are a requirement for Bioconductor packages, providing high-quality documentation and a thorough demonstration of the functionality in the package.
6.15.0.1 Using rworkflows
rworkflows::use_vignette_getstarted creates a basic “Get started” vignette in
a style that is compatible with automatically rendering pkgdown documentation websites.
The author: field within the vignette yaml header is also dynamically filled from the information within the DESCRIPTION file, so it will always be up-to-date without having to manually edit it each time the authors in the DESCRIPTION change.
In the example below, the command creates a new vignette file:
vignettes/MyBioconductorPackage.Rmd
rworkflows::use_vignette_getstarted(package = "MyBioconductorPackage")
6.15.0.2 Using usethis + biocthis
In this example, we use the function biocthis::use_bioc_vignette() to
initialise a template vignette that we can examine and edit as needed.
## Only works if the folder name is the same as the package name
pkg <- basename(usethis::proj_get())

biocthis::use_bioc_vignette(pkg, paste("Introduction to", pkg))
The R console displays information as package dependencies required for the
compilation of the template vignette are added to the file DESCRIPTION.
Simultaneously, a sub-directory vignettes/ is created,
and a R Markdown file MyBioconductorPackage.Rmd is created within that new
sub-directory.
Additionally, the file .gitignore is edited to add entry inst/doc that
excludes compiled vignettes from version control, as those will be compiled
automatically on the Bioconductor repository.
Another file .gitignore is created within the sub-directory vignettes/,
to ignore HTML files and R scripts specifically within that sub-directory.
✔ Adding 'knitr' to Suggests field in DESCRIPTION
• Use `requireNamespace("knitr", quietly = TRUE)` to test if package is installed
• Then directly refer to functions with `knitr::fun()`
✔ Adding 'BiocStyle' to Suggests field in DESCRIPTION
• Use `requireNamespace("BiocStyle", quietly = TRUE)` to test if package is installed
• Then directly refer to functions with `BiocStyle::fun()`
✔ Adding 'RefManageR' to Suggests field in DESCRIPTION
• Use `requireNamespace("RefManageR", quietly = TRUE)` to test if package is installed
• Then directly refer to functions with `RefManageR::fun()`
✔ Adding 'sessioninfo' to Suggests field in DESCRIPTION
• Use `requireNamespace("sessioninfo", quietly = TRUE)` to test if package is installed
• Then directly refer to functions with `sessioninfo::fun()`
✔ Setting VignetteBuilder field in DESCRIPTION to 'knitr'
✔ Adding 'inst/doc' to '.gitignore'
✔ Creating 'vignettes/'
✔ Adding '*.html', '*.R' to 'vignettes/.gitignore'
✔ Adding 'rmarkdown' to Suggests field in DESCRIPTION
• Use `requireNamespace("rmarkdown", quietly = TRUE)` to test if package is installed
• Then directly refer to functions with `rmarkdown::fun()`
✔ Writing 'vignettes/MyBioconductorPackage.Rmd'
• Modify 'vignettes/MyBioconductorPackage.Rmd'
When the command completes, the source vignette file
vignettes/MyBioconductorPackage.Rmd is automatically opened in the source pane
of the RStudio application.
In this example, in the header section of the file, we replace the placeholder values in the author field.
  - name: Kevin Rue-Albrecht
    affiliation:
    - University of Oxford
    email: kevin.rue-albrecht@imm.ox.ac.uk
Note:
- Multiple authors can be added as additional entries in that section.
The template vignette is somewhat large to include in this chapter. We encourage you to read the contents carefully, editing, removing, and adding contents as you see fit. Vignette are live documents that can be updated either to reflect updates to the package source code, or in their own right, to refine the documentation distributed with the package.
In this example, we leave the rest of the template vignette to its original contents.
6.16 Enable GitHub Actions
In the earlier section Add badges to the README file, we added a badge that reports the status of a GitHub Actions workflow that we are only about to create now.
6.16.1 Key differences between rworkflows vs. usethis + biocthis strategies
When it comes to GitHub Actions, there is one major key difference between the two strategies:
-
Using
rworkflows: Uses a centrally maintained action (eponymously namedrworkflows) that is distributed via the GitHub Actions Marketplace. This strategy only generates a short yaml file that contains parameters for calling the mainrworkflowsaction. -
Using
usethis+biocthis: Generates a static yaml file containing the full code to run all steps of the workflow.
This means that when using the latter strategy, if anything in the static workflow file breaks the user must debug it themselves or wait until the next release of Bioconductor (in the case of biocthis).
In contrast, fixes pushed to the rworkflows action are immediately propagated to all users of the action the next time they run GitHub Actions. Users also have more nuanced control over which version of the rworkflows action they wish to call, as GitHub Actions support tagged releases (e.g. @v1) in addition to calling from specific branches (e.g. @master).
6.16.2 Using rworkflows
To set up GitHub Actions with rworkflows, the following command only needs to be run once per R package. This generates a short yaml workflow containing just the runners (which OS platforms you want to launch GitHub Actions on) and the parameters to call the rworkflows action with.
See ?rworkflows::use_workflow for a full description of all arguments.
rworkflows::use_workflow(run_pkgdown = TRUE,
                         run_rcmdcheck = TRUE,
                         run_bioccheck = TRUE)
These parameters can be updated at any time by simply rerunning the function while setting the argument force_new=TRUE to overwrite the old yaml file.
Here is a diagram of the full rworkflows pipeline:

6.16.3 Using usethis + biocthis
In this example, we use the function biocthis::use_bioc_github_action() to
initialise a template GitHub Actions workflow that includes a number of actions
typically performed during software development to verify the integrity and
functionality of software package.
This process – called continuous integration – is extremely valuable to
identify issues as early as possible in the software development process,
preferably as part as automated testing, and before those issues reach users.
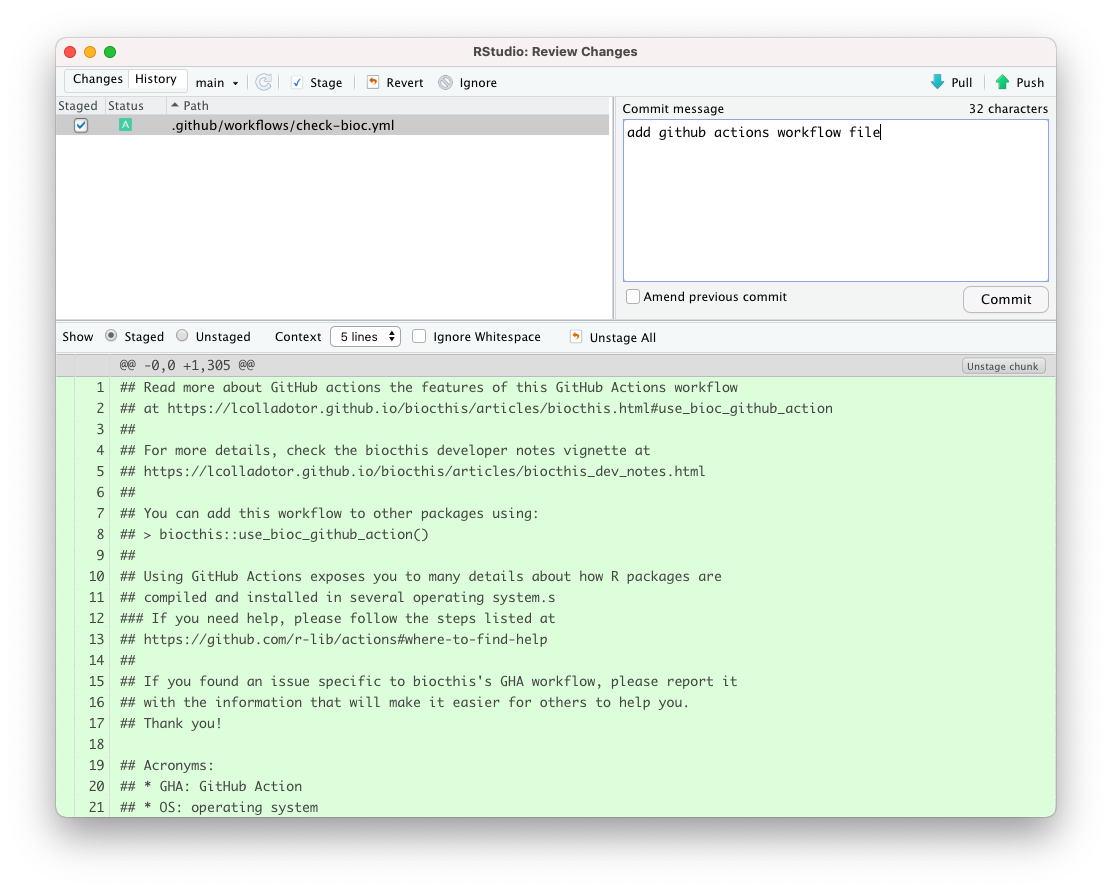
biocthis::use_bioc_github_action()The R console displays information as a sub-directory .github/workflows/ and
a file check-bioc.yml within that sub-directory.
✔ Creating '.github/workflows/'
✔ Writing '.github/workflows/check-bioc.yml'
The new file .github/workflows/check-bioc.yml is somewhat large to display in
this chapter (300+ lines).
In this example, we use the RStudio “Find and Replace” functionality to replace
all occurrences of refs/heads/master in the file by refs/heads/main.
This is because the default branch of our repository is called main, not
master.
Note:
- In our example, there were 5 occurrences to replace.
In this example, we keep the strategy matrix to use R version 4.1 and
Bioconductor version 3.14.
Those specification represent the version of R and Bioconductor that will be
used to run the GitHub Action workflow, including the installation of package
dependencies, which in turn may impact the outcome of the unit tests.
Notes:
- Bioconductor packages should be tested in an environment that uses the development version of R (“R-Devel”) and the development version of Bioconductor (“Bioc Devel”).
- A new version of R is typically released annually in April/May
- A new version of Bioconductor is typically released bi-annually; in April/May (shortly after the R release) and in October.
- You will need to update the version of R and Bioconductor specified in the GitHub Actions workflow as new versions of R and Bioconductor are released.
In this example, in the section named Run CMD check, we also replace
error_on = "warning" by error_on = "error".
This change allows R CMD check to report a successful build build even in the
presence of warning messages.
          rcmdcheck::rcmdcheck(
              args = c("--no-manual", "--no-vignettes", "--timings"),
              build_args = c("--no-manual", "--keep-empty-dirs", "--no-resave-data"),
              error_on = "error",
              check_dir = "check"
)Note:
- Bioconductor recommends that packages should pass
R CMD checkwithout any WARNING nor ERROR message.
6.17 Deploy GitHub Actions
In this example, we have regularly made commits to the git repository as we progressed through each section.
We make a new commit now, all the files that we have recently created and
edited, and we push the new git commit to GitHub.
This can be done through a set of commands typed on the command line in a
Terminal (e.g., the Terminal panel of the RStudio application), or using the
Git panel of the RStudio application.
6.17.1 Push changes to GitHub
6.17.1.2 Using the RStudio Git panel
We click the Git tab, then the Diff button, and in the popup, we type a
commit message that describes the changes that we are making in this commit.
Then we click the Commit button, and the Push button.
When the commit reaches the GitHub repository, the presence of the file
.github/workflows/*.yml prompts GitHub to execute the GitHub Actions
workflow.
The log file produced by the GitHub Action workflow can be watched as it is being generated, in the “Actions” tab of the GitHub repository.
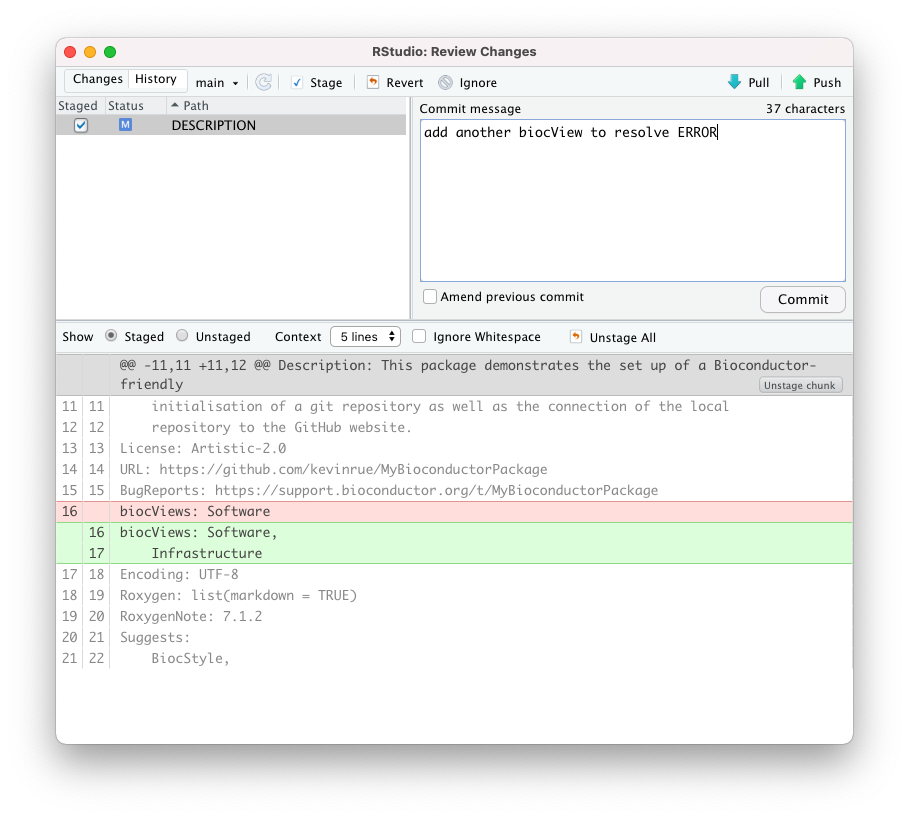
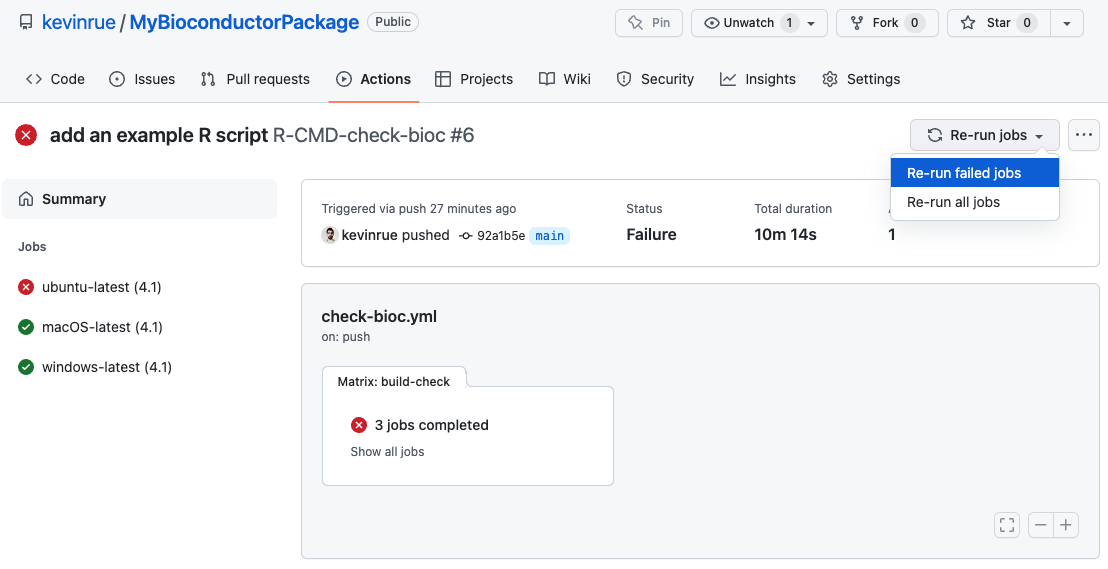
In this example, when the GitHub Action workflow completes, we see that it
reports a single ERROR message that occurred during the step running
BiocCheck::BiocCheck().
The full report is fairly long,
but here is the part containing the ERROR message:
* Checking for non-trivial biocViews...
    * ERROR: Add biocViews other than Software
Full GHA report
<paste report here>
To resolve that ERROR message, in this example, we open the file DESCRIPTION
and add the term Infrastructure to the section biocViews.
biocViews: Software,
    Infrastructure
Then, we make another commit and push the updated repository to GitHub.
ERROR in the GitHub Actions workflow.When the push to the GitHub repository completes, the GitHub Actions workflow
is automatically triggered.
In this example, we are pleased to see that the previous ERROR message does not
appear in the new report.
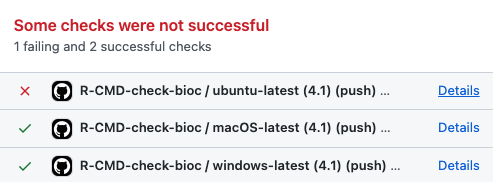
However, we see that an issue is now reported, specifically on the Ubuntu platform. We will address this issue in the next section.
6.17.2 Special commit messages
When pushing commits to GitHub while GitHub Actions is enabled, you can add special keywords to the commit messages to get certain behaviour.
-
[skip ci]:- Behaviour: One of several synonymous keywords that prevent GitHub Actions from launching after pushing that commit.
- Scope: Can be used for any GitHub Actions workflow.
-
/nocache:- Behaviour: Overrides using any cached files or software installations from previous runs on GitHub Actions.
-
Scope: Applies only to workflows generated with
rworkflowsorbiocthis.
6.18 Add R code
So far – in this example – we have been developing the infrastructure of our
new package, without adding any source code to the sub-directory R/.
As such, the package does not provide any new functionality.
Moreover, despite the fix introduced in the previous section, the absence of code still causes an issue during the execution GitHub Action workflow, specifically on the Ubuntu platform
The relevant GitHub Actions report is available at: https://github.com/kevinrue/MyBioconductorPackage/runs/6388447895?check_suite_focus=true
Specifically, the relevant part of the report is displayed below.
> Run covr::codecov()
Error in file(con, "r") : cannot open the connection
Calls: <Anonymous> -> package_coverage -> add_hooks -> readLines -> file
In addition: Warning message:
In file(con, "r") :
  cannot open file '/tmp/RtmpSRVmSc/R_LIBSa203b2bd7d4/MyBioconductorPackage/R/MyBioconductorPackage': No such file or directory
Execution halted
Error: Process completed with exit code 1.
To address this issue, we create an R script example.R in the R/
sub-directory of our package, and we write a simple function in that package.
## example.R
my_bioc_function <- function(x, y) {
  message("This is an example function")
  return(x + y)
}
We save the file, and then we commit and push it to the GitHub repository.

R/ sub-directory.When the GitHub Action completes, we gladly see that the previous error message has now disappeared. The report is available at: https://github.com/kevinrue/MyBioconductorPackage/runs/6388803864?check_suite_focus=true.
Unfortunately, we also notice that another issue has now occurred later in the workflow. We will address this issue in the next section.
6.19 GitHub Pages
In the GitHub Actions report produced by our changes in the previous section,
we see that an error is reported in the section Build and deploy pkgdown site.
The error message is copied below.
> Run git config --local user.name "$GITHUB_ACTOR"
Run git config --local user.name "$GITHUB_ACTOR"
Running git checkout --orphan gh-pages
Switched to a new branch 'gh-pages'
Running git rm -rf --quiet .
Running git commit --allow-empty -m 'Initializing gh-pages branch'
[gh-pages (root-commit) 513d36d] Initializing gh-pages branch
Running git push origin 'HEAD:gh-pages'
remote: Permission to kevinrue/MyBioconductorPackage.git denied to github-actions[bot].
fatal: unable to access 'https://github.com/kevinrue/MyBioconductorPackage/': The requested URL returned error: 403

Error: <system_command_status_error in callr::run("git", c(...), echo_cmd = echo_cmd, echo = echo, error_on_status ...:
 System command 'git' failed, exit status: 128, stdout & stderr were printed>

Stack trace:
 1. pkgdown::deploy_to_branch(new_process = FALSE)
 2. pkgdown:::git("push", remote, paste0("HEAD:", branch))
 3. callr::run("git", c(...), echo_cmd = echo_cmd, echo = echo, error_on_status ...
 4. throw(new_process_error(res, call = sys.call(), echo = echo,  ...

 x System command 'git' failed, exit status: 128, stdout & stderr were printed
Execution halted
Error: Process completed with exit code 1.
This error message is somewhat dense and not entirely straightforward to interpret.
However, the solution to this issue is to run the following set of commands in the R console of the RStudio application.
pkgdown::deploy_to_branch()Note:
- The function
pkgdown::deploy_to_branch()is the same as the GitHub Action workflow tries to run. However, it must be run once manually to set things up, in such a way that the GitHub Action workflow can use that setup to perform its function in subsequent runs. - Even when run in the R console of the RStudio application, the function will
conclude with an error message.
However, even then, it will have done what we needed it to do; namely, create
a branch named
gh-pagesin the git repository, and push that branch to the GitHub clone of the repository. The harmless error message is shown below.
-- RMarkdown error ------------------------------------------------------------------------------
Quitting from lines 2-22 (MyBioconductorPackage.Rmd)
Error in packageVersion(pkg) :
there is no package called 'MyBioconductorPackage'
-------------------------------------------------------------------------------------------------
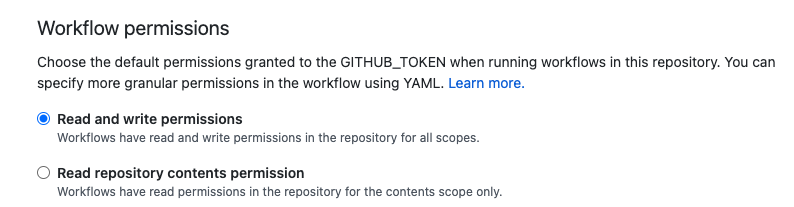
Error in !trace_length(trace) : invalid argument typeFurthermore, we also need to change some settings in the GitHub repository,
allowing the automated GitHub Actions workflow to push changes to the newly
created branch gh-pages.
We navigate to the Settings tab of the GitHub repository, then under the
Actions and General sub-sections, we scroll down to the section
Workflow permissions and tick the option Read and write permissions.
Finally, we click the Save button at the bottom of the page.
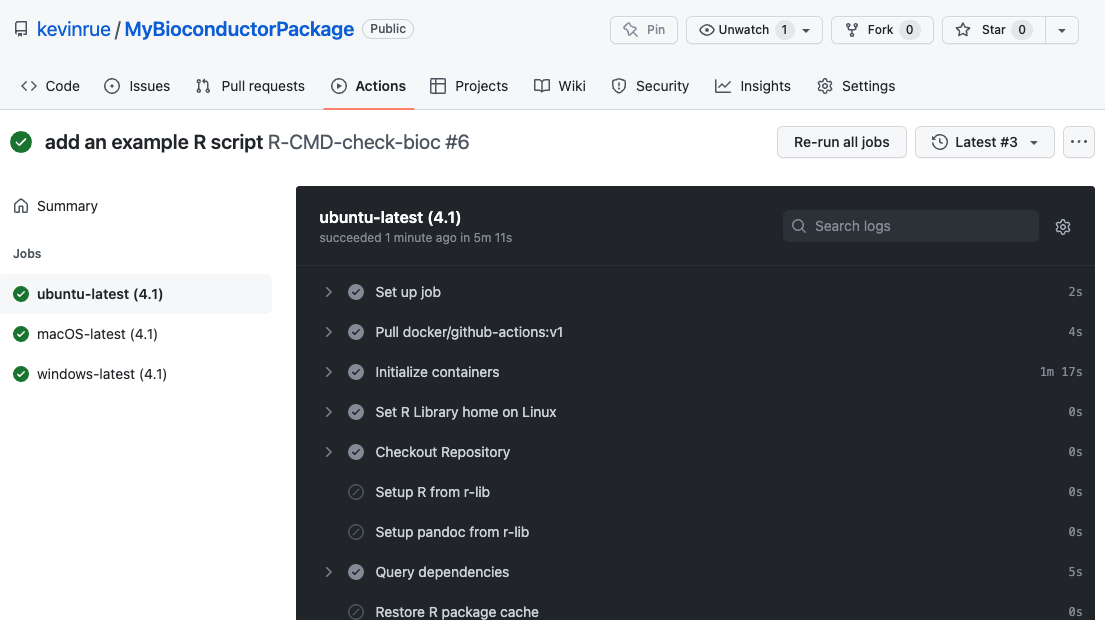
At this point, we can force GitHub to re-run the failed workflow, in the
Actions tab of the repository.
In this example, when the GitHub Actions workflow completes, we see now our first fully successful build report!
An exciting output of this section is the online deployment of the package
documentation on GitHub Pages.
Specifically, the contents of the branch gh-pages are available for each
GitHub repository at a URL built as <username>.github.io/<repository>.
In this example, that is https://kevinrue.github.io/MyBioconductorPackage/.
In doubt, one way to identify that address for your own repository is to
navigate to the Settings tab, in the Pages section, and you will find
the URL at the top of that page.
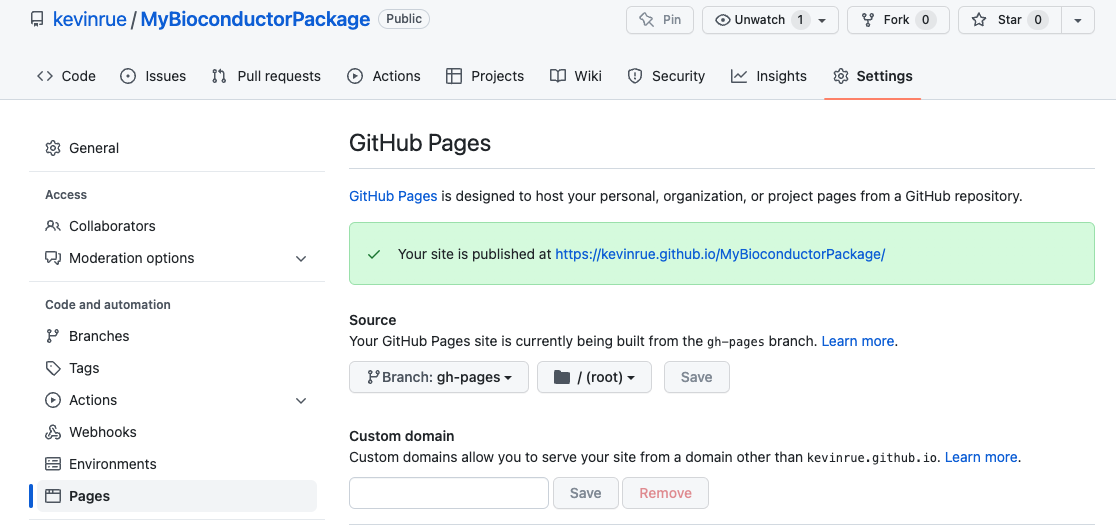
Navigate to that URL to find the online version of your package documentation!
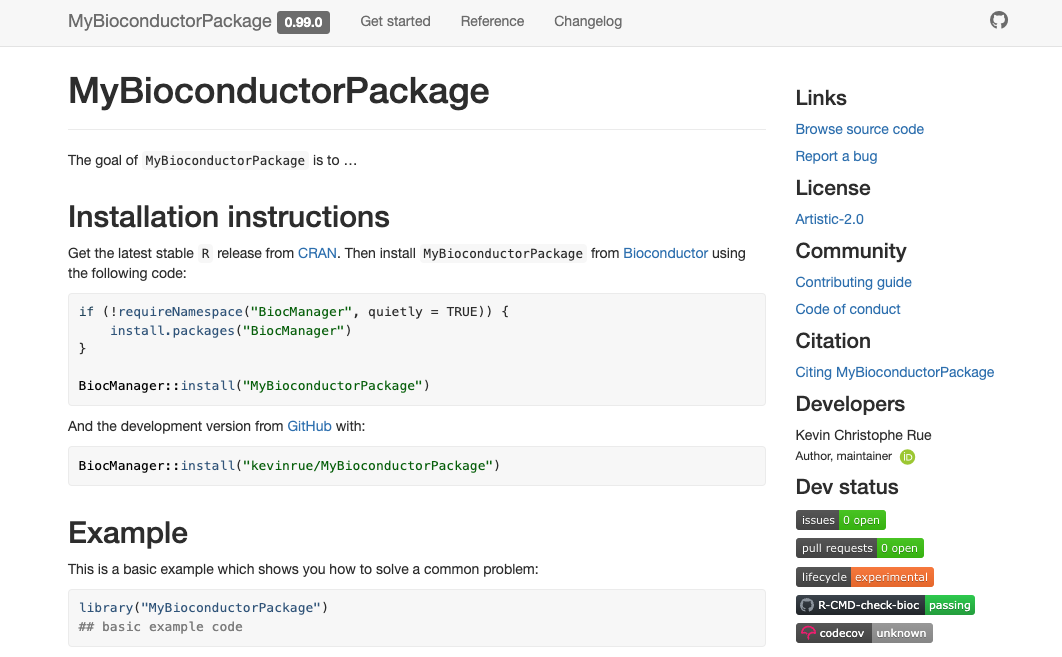
pkgdown
6.20 Summary
6.20.1 Continue developing the package
At this point, all the essential components of our new Bioconductor-friendly package are in place.
We are now in a place where we can safely focus more of our attention to the source code and documentation of the package. Those are topics that will be covered in more details in other sections of this book.
6.20.2 Takeaways
In the meantime, the takeaways from this chapter are:
- Updates to a package often require edits across multiple files:
- The version of the package is defined in the file
DESCRIPTION. - A description of the changes in each version is added to the file
inst/NEWS.md - Source code is added in the sub-directory
R/. - Unit tests are added in the sub-directory
tests/testthat. - Vignettes are added in the sub-directory
vignettes/. - Updates affecting the file
README.Rmdrequires you to re-compile that file, to apply those changes to the fileREADME.md.
- The version of the package is defined in the file
- The GitHub Actions are run every time the repository is pushed.
- Use the GitHub Actions report to identify and monitor issues that you should fix in your package.
- Many aspects of software development are subject to changes, from Bioconductor best practices and requirements, to packages intended to facilitate your work – e.g.: rworkflows, usethis and biocthis. You may need to stay informed and willing to adapt the contents of your package to match new requirements.
- This chapter describes a number of optional components, and an opinionated workflow to set up the infrastructure of a Bioconductor-friendly package. Once you are familiar with the components that are essential or optional for a Bioconductor package, you are entirely free to devise your own workflow to achieve a working Bioconductor-friendly package!
Finally, a regular reminder that you are very welcome to join the Bioconductor community and communicate with fellow package users and developers on the Bioconductor Slack workspace and the Bioconductor Support site.
6.21 Further reading
6.21.1 rworkflows
6.21.2 biocthis
- biocthis para ConectaR2021 - Leonardo Collado Torres (2020-01-28; 2 min video; Spanish) for ConectaR 2021.
- biocthis slides - Leonardo Collado Torres (2020-11-05; English) for the Bioconductor Technical Advisory Board.
- Making R/Bioconductor packages with biocthis: recount3 use case - Leonardo Collado Torres (2020-09-10; 55 min video; English).
6.21.3 Making a Bioconductor package
- kevinrue/MyBioconductorPackage - GitHub repository created in this chapter (2022-05-11)
- Create and submit a package to Bioconductor - Kayla Interdonato (2020-09-10; workshop; English)
- Creating a Bioconductor Package - Benjamin Stubbs (2018-11-20; Boston Meetup)
- Workshop - Building a Bioconductor Package - Saskia Freytag (2021-01-19; English)
- Bioconductor Packages: Development, Maintenance, and Peer Review (2021-present; book)
- SaskiaFreytag/making_bioconductor_pkg - GitHub repository created in a workshop (2020)
- lshep/MakeAPackage - Lori Shepherd (2017)